

📑 Table of Contents ▶
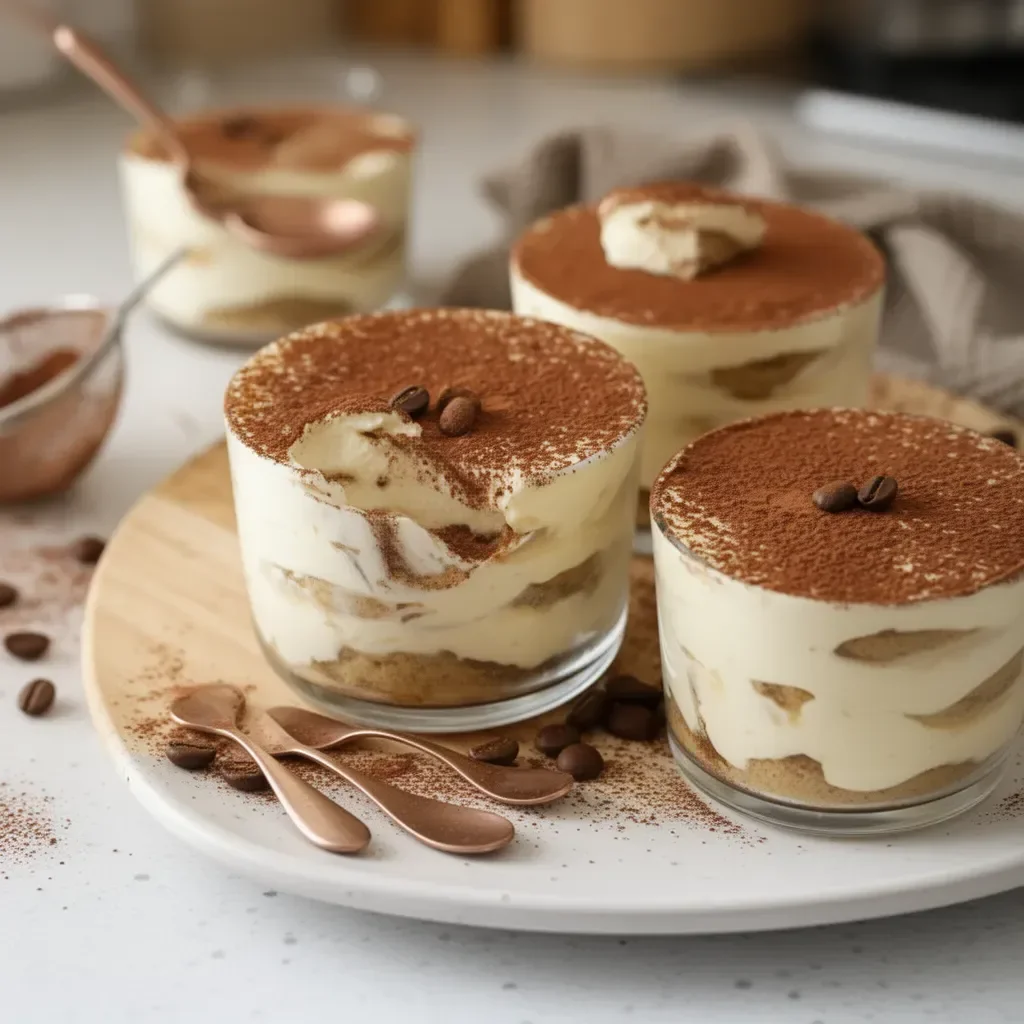
Tiramisu Cups
A few years ago, I attended a family gathering where dessert was the highlight. Everyone gathered around as my aunt revealed her famous tiramisu, made elegantly in individual cups. The aroma of coffee and cocoa wafted through the room, teasing our taste buds. Each bite was a delightful dance of creamy mascarpone and coffee-soaked ladyfingers that seemed to melt in your mouth.
That moment sparked a passion for recreating this classic dessert in a way that brought the same joy into my own home. Tiramisu cups became my go-to treat for gatherings, celebrated for their elegant presentation and simple charm. The combination of rich ingredients and flavors in these cups makes them perfect for both special occasions and everyday indulgence.
Creating these tiramisu cups is not just about the flavors; it’s about the experience. The anticipation as you wait for them to chill brings a sense of excitement. Whether it’s a dinner party or a cozy night in, these tiramisu cups deliver satisfaction that resonates with everyone around the table. The richness of heavy cream and mascarpone blends effortlessly with the espresso-soaked biscuits, creating a dessert that transcends time and trend.
Tiramisu Cups: Fundamentals
Fundamentals
Tiramisu cups represent the delightful union of flavors and textures, making them a favorite among dessert lovers. The essence of tiramisu lies in its creamy layers contrasted with the slightly firm, soaked ladyfingers. Understanding the fundamentals of this dessert is key to achieving perfection in every bite.
At its core, tiramisu features three essential layers: the luxurious mascarpone cream, the coffee-soaked Savoiardi biscuits, and a dusting of cocoa powder. Each layer plays a crucial role in building the perfect flavor profile. The mascarpone cheese brings a smooth richness, while the coffee and optional liqueur infuse depth and vibrancy.
Preparation and Setup
Preparing tiramisu cups starts with organizing your ingredients and workspace. A clean kitchen leads to a more enjoyable cooking session. Gather the heavy whipping cream, mascarpone cheese, caster sugar, vanilla extract, ladyfinger biscuits, espresso, and cocoa powder.
Set out four clear serving glasses or cups, making sure they can showcase the beautiful layers of the dessert. Using transparent cups not only adds a visual appeal but also allows everyone to appreciate the artistry of the layers. With all ingredients at the ready, you’re set to indulge in the preparation of these delectable cups.
Ingredients
- 1 cup thickened cream, heavy whipping cream, cold (250ml)
- 1 cup mascarpone cheese, cold (250g / 8.8oz)
- ¼ cup caster sugar (superfine sugar)
- 1 teaspoon vanilla extract
- 12 Savoiardi (ladyfinger biscuits)
- ⅔ cup espresso (strong coffee), room temperature
- 1 tablespoon liqueur, optional (such as Frangelico)
- ½ tablespoon cocoa powder, for dusting
Directions
-
In a medium bowl, beat the cold heavy whipping cream with an electric mixer until it reaches the soft peak stage. This introduces air into the mixture, making it light and fluffy.
-
In a separate bowl, combine mascarpone cheese, caster sugar, and vanilla extract. Beat them together until just combined. Avoid overbeating, as this can lead to curdling.
-
Gently fold one-third of the whipped cream into the mascarpone mixture. Be cautious not to knock out the air. Repeat this process in two additional stages until fully combined.
-
Pour the espresso and optional liqueur into a casserole dish. Quickly add the Savoiardi biscuits, turning them almost immediately to soak up all the coffee. They should be soft but still maintain a slight bite in the middle.
-
Break four of the soaked biscuits in half and place them evenly among the four serving glasses.
-
Spread a layer of the creamy mascarpone mixture over the soaked biscuits using an offset spatula.
-
Repeat the layering process: add more soaked biscuits, followed by another layer of cream mixture. Aim to level out the top layer, though it doesn’t have to reach the very top of the glass.
-
Cover and refrigerate the cups for at least 2 hours, or up to 2 days, before serving.
-
Just before serving, dust the tops with cocoa powder for a finishing touch.
Tiramisu Cups: Technique
Technique
Mastering the technique behind tiramisu cups is essential for achieving that perfect dessert. Start by carefully whipping the cream to soft peaks. This ensures the texture is light and airy, crucial for that lovely mouthfeel that tiramisu is known for.
When working with mascarpone, gentle mixing is important. Overbeating can cause the cheese to become grainy, ruining the silky texture of the cream. Always fold in the whipped cream gently to retain airiness. Use a spatula, starting from the bottom and folding over the top, to evenly incorporate the mixtures without deflating them.
Tips and Tricks
-
Choose quality espresso for the best flavor. The richness of a strong brew enhances the overall experience of the tiramisu.
-
Don’t skip the soaking step! Allowing the biscuits to absorb the espresso ensures each layer oozes with flavor.
-
If time permits, let the tiramisu cups chill overnight. This allows the flavors to meld beautifully, creating a richer dessert experience.
-
For added depth of flavor, consider adding a little cinnamon to the cocoa dusting.
-
Be mindful of the liqueur; not all guests may enjoy alcohol. You can easily omit this ingredient without losing the essence of the dessert.
Perfecting Tiramisu Cups: Master Techniques
Perfecting Results
Getting tiramisu cups just right requires experience and attention to detail. Every ingredient plays a role, but the balance of flavor is what truly makes a difference. Taste the mascarpone mixture before layering. Adjust sweetness by adding a little more sugar if necessary.
The ideal coffee-soaked biscuits should feel moist but not soggy. They need a delicate balance for the right texture. If they absorb too much liquid, they lose structure; if too little, they leave a dry layer.
Troubleshooting and Variations
Sometimes things don’t go as planned. If your cream doesn’t reach soft peaks, double-check the temperature of your ingredients. Cold cream whips up better. If you accidentally overmix the mascarpone and it curdles, try folding in a little whipped cream to soften the texture.
If you’re looking for variations, consider replacing some mascarpone with whipped ricotta for a unique twist. For a vegan option, use coconut cream and vegan cream cheese, and make sure to find ladyfingers without eggs.
Tiramisu Cups: Serving and Pairing
Serving and Presentation
Presentation is key when serving tiramisu cups. The layered look makes each cup visually stunning. Consider garnishing the top with a sprinkle of cocoa powder or even chocolate shavings for an extra touch of elegance. You could also use fresh berries to add a pop of color.
Make sure to serve these tantalizing cups chilled, as this enhances the flavors and brings a refreshing bite. For a classy touch, present them on a decorative platter or with fresh mint leaves as an aromatic addition.
Pairings and Storage
Tiramisu cups pair well with a variety of flavors. Consider complimenting them with fresh fruits like strawberries or raspberries, adding a nice contrasting tartness. The creaminess also works beautifully alongside a bold coffee or a cup of rich hot chocolate.
Store any leftover cups covered in the fridge. They can last for up to two days, but the flavor and texture are best enjoyed fresh. Always dust with cocoa powder just before serving to maintain the vibrant presentation.
This delightful dessert brings joy and satisfaction anytime it’s served. Embrace the process of creation, and indulge in each layer, as it transforms traditional flavors into a refreshing and elegant treat. Enjoy your experience crafting these tiramisu cups, perfect for sharing with friends and family alike.
Print
Tiramisu Cups
- Prep Time: 20 minutes
- Cook Time: 0 minutes
- Total Time: 120 minutes
- Yield: 4 servings
- Category: Dessert
- Method: No-Cook
- Cuisine: Italian
- Diet: Vegetarian
Description
Elegant and creamy tiramisu cups featuring layers of mascarpone, espresso-soaked ladyfingers, and a dusting of cocoa.
Ingredients
- 1 cup thickened cream, heavy whipping cream, cold (250ml)
- 1 cup mascarpone cheese, cold (250g / 8.8oz)
- ¼ cup caster sugar (superfine sugar)
- 1 teaspoon vanilla extract
- 12 Savoiardi (ladyfinger biscuits)
- ⅔ cup espresso (strong coffee), room temperature
- 1 tablespoon liqueur, optional (such as Frangelico)
- ½ tablespoon cocoa powder, for dusting
Instructions
- Beat the cold heavy whipping cream with an electric mixer until it reaches the soft peak stage.
- Combine mascarpone cheese, caster sugar, and vanilla extract in a separate bowl and beat until just combined.
- Fold one-third of the whipped cream into the mascarpone mixture, then repeat with the remaining cream in two additional stages.
- Pour the espresso and optional liqueur into a casserole dish and soak the Savoiardi biscuits quickly.
- Break four of the soaked biscuits in half and place them evenly among the serving glasses.
- Spread a layer of the creamy mascarpone mixture over the soaked biscuits.
- Repeat the layering process until you run out of ingredients.
- Cover and refrigerate the cups for at least 2 hours before serving.
- Dust with cocoa powder before serving.
Notes
For best results, chill overnight to enhance the flavors. Use good quality espresso for richness.