

📑 Table of Contents ▶
Mini Black Forest Cheesecakes
A random craving for something sweet can lead to delightful culinary adventures. One rainy afternoon, the idea of Mini Black Forest Cheesecakes blossomed in my mind. The thought of rich, creamy cheesecake paired with the tartness of cherries instantly became the focus of my kitchen. These delightful treats not only satisfied my sweet tooth but also transported me straight to a nostalgic place filled with laughter and shared desserts.
The beauty of Mini Black Forest Cheesecakes lies in their simplicity and impressive presentation. As I prepared to create them, the combination of chocolate cookie crumbs and luscious cheesecake filling promised a heavenly experience. With each bite, the cherry topping glistened, adding a burst of flavor and beautiful contrast to the deep chocolate crust.
Baking these mini cheesecakes brought back memories of family gatherings where desserts were the highlight. The creativity involved in crafting individual servings meant everyone could indulge in their own sweet escapade. With each layer of flavor, these cheesecakes became a celebration of taste, texture, and joyful moments.
The process of making Mini Black Forest Cheesecakes is straightforward, combining simple ingredients into a dish that feels extraordinary. Getting started is just a matter of gathering the essentials and following a few easy steps to create a festive treat everyone will love.
Creating Mini Black Forest Cheesecakes
Fundamentals
Understanding the key components of Mini Black Forest Cheesecakes is essential for achieving the perfect dessert. The crust provides a rich, chocolatey base that anchors the creamy filling, created using softened cream cheese. Incorporating fresh ingredients makes each bite delightful and fulfilling. The interplay of flavors—rich chocolate, tangy cherries, and smooth cheesecake—creates a delightful masterpiece that tantalizes the taste buds.
Focusing on quality ingredients is crucial. Opt for high-quality chocolate cookies for the crust and fresh cream cheese for the filling. These elements contribute to the texture and flavor of the final dish. Each component serves a purpose, helping to create the perfect balance of sweetness and richness.
Preparation/setup
Start your baking adventure by preheating the oven to 325°F (163°C), ensuring an even bake. Prepare your muffin tin with parchment sleeves or mini cheesecake molds, which will make removing the cheesecakes effortless once they’re finished. This careful prep sets the stage for an easier clean-up and a polished presentation.
Gather your ingredients—a simple mix of chocolate cookie crumbs, butter for the crust, cream cheese, and sugar for the filling—before diving into the process. This organized approach streamlines the preparation and enhances your baking experience.
Ingredients
Gather the following ingredients for the cheesecakes:
-
For the Crust:
- 1 1/2 cups chocolate cookie crumbs
- 1/4 cup unsalted butter, melted
-
For the Cheesecake Filling:
- 16 oz cream cheese, softened
- 1/2 cup granulated sugar
- 2 large eggs
- 1/2 cup sour cream
- 1 teaspoon vanilla extract
-
For the Topping:
- 1/2 cup cherry pie filling or cherry compote
- 1/4 cup chocolate ganache (melted chocolate + cream)
- Fresh cherries, for garnish
- Dark chocolate squares or shavings
Directions
- Preheat the oven to 325°F (163°C). Line a muffin tin with parchment sleeves or use mini cheesecake molds.
- Combine chocolate cookie crumbs and melted butter in a bowl. Mix until fully combined.
- Press the crumb mixture firmly into the base of each mold to form the crust. Set it aside while you prepare the filling.
- In a large bowl, beat the softened cream cheese and sugar until smooth. Add the eggs one at a time, mixing just until fully incorporated. Stir in the sour cream and vanilla extract until well-blended.
- Pour the cheesecake batter over the prepared crusts, filling each almost to the top.
- Swirl in cherry pie filling with a toothpick or skewer for a marbled effect.
- Bake for 18–20 minutes, or until the centers are set but still slightly jiggly. Allow them to cool completely.
- Refrigerate for at least 4 hours or overnight to firm up.
- Before serving, drizzle with chocolate ganache and top with fresh cherries and pieces of dark chocolate.

Techniques for Mini Black Forest Cheesecakes
Mastering Techniques
Creating Mini Black Forest Cheesecakes requires precision and attention to detail. One effective technique is ensuring your cream cheese is softened adequately before mixing. This step prevents any lumps, giving the filling a perfectly smooth texture that enhances the overall dessert experience.
Using a toothpick or skewer for swirling the cherry filling into the cheesecake batter allows for artistic flair. Experiment with different swirling patterns to create unique designs on each cheesecake. This creative touch elevates the presentation of your baked goods, making them irresistibly appealing.
Tips and Tricks
One useful tip is to let the cheesecakes cool in the pan for about 30 minutes before transferring them to the refrigerator. This gradual cooling period helps maintain their shape. If the cheesecakes can be a bit jiggly in the middle after baking, don’t worry. They will firm up during refrigeration, resulting in the perfect texture.
For a more intense chocolate flavor in the crust, consider using chocolate sandwich cookies. The additional cream filling can enhance the richness. The option of varying the fruit topping—such as using fresh berries instead of cherries—can provide an interesting twist to the classic recipe while still delivering that signature look and feel.
Perfecting Results
Achieving the Ideal Cheesecake
Achieving the right balance between baked and creamy is key to perfecting your Mini Black Forest Cheesecakes. The ideal texture should be creamy without being overly dense. To achieve this, monitor the baking time closely; consider checking the cheesecakes a minute or two before the recommended time.
Another way to ensure even baking is to place the muffin tin in the center of the oven. This position guarantees that the heat circulates evenly, promoting consistent results throughout. Additionally, be cautious when overmixing after adding the eggs, as it can introduce excess air, leading to cracks in the surface during baking.
Troubleshooting and Variations
If your cheesecakes develop cracks, it could mean they overbaked or the oven temperature was too high. Reducing the temperature slightly in future attempts can prevent this. Alternatively, adding a sour cream topping after baking can also mask imperfections while enhancing flavor.
For variations, feel free to switch up the fruit topping or incorporate different flavors into the cheesecake batter. A splash of almond or orange extract can create alternative flavors that add a delightful complexity to your cheesecakes.
Serving and Storage
Presentation Ideas
Garnishing your Mini Black Forest Cheesecakes makes them visually stunning. Fresh cherries not only add color and vibrancy but also enhance the flavor profile. For added elegance, drizzle the chocolate ganache artistically over the top. Consider using a piping bag for precise garnishing to showcase your creativity.
Present the cheesecakes on a beautiful platter or cake stand to create an impressive display. A sprinkle of chocolate shavings or a dusting of cocoa powder enhances their aesthetic and provides added texture.
Pairings and Storage Tips
These mini cheesecakes pair perfectly with a variety of non-alcoholic beverages. Enjoy with coffee, tea, or a refreshing soda for a delightful contrast that complements the richness of the dessert. Serving them alongside a scoop of vanilla ice cream adds an extra creamy dimension.
Store any leftovers in an airtight container in the refrigerator. They will last up to five days, maintaining their delicious flavors and textures. Allow them to come to room temperature before serving for the best experience—this enhances the cheesecakes’ creamy consistency and overall appeal.
The creation of Mini Black Forest Cheesecakes marries creativity and confectionery skills. These gems offer a delectable treat for any occasion, from family gatherings to casual get-togethers, celebrating flavor in every bite.
Print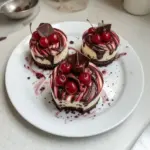
Mini Black Forest Cheesecakes
- Prep Time: 15 minutes
- Cook Time: 20 minutes
- Total Time: 240 minutes
- Yield: 12 servings
- Category: Dessert
- Method: Baking
- Cuisine: German
- Diet: Vegetarian
Description
Delightful mini cheesecakes featuring rich chocolate crusts and a creamy filling, topped with cherry pie filling and chocolate ganache.
Ingredients
- 1 1/2 cups chocolate cookie crumbs
- 1/4 cup unsalted butter, melted
- 16 oz cream cheese, softened
- 1/2 cup granulated sugar
- 2 large eggs
- 1/2 cup sour cream
- 1 teaspoon vanilla extract
- 1/2 cup cherry pie filling or cherry compote
- 1/4 cup chocolate ganache (melted chocolate + cream)
- Fresh cherries, for garnish
- Dark chocolate squares or shavings
Instructions
- Preheat the oven to 325°F (163°C). Line a muffin tin with parchment sleeves or use mini cheesecake molds.
- Combine chocolate cookie crumbs and melted butter in a bowl. Mix until fully combined.
- Press the crumb mixture firmly into the base of each mold to form the crust. Set it aside while you prepare the filling.
- In a large bowl, beat the softened cream cheese and sugar until smooth. Add the eggs one at a time, mixing just until fully incorporated. Stir in the sour cream and vanilla extract until well-blended.
- Pour the cheesecake batter over the prepared crusts, filling each almost to the top.
- Swirl in cherry pie filling with a toothpick or skewer for a marbled effect.
- Bake for 18–20 minutes, or until the centers are set but still slightly jiggly. Allow them to cool completely.
- Refrigerate for at least 4 hours or overnight to firm up.
- Before serving, drizzle with chocolate ganache and top with fresh cherries and pieces of dark chocolate.
Notes
Let the cheesecakes cool in the pan for about 30 minutes before transferring to the refrigerator. Leftovers can be stored in an airtight container for up to five days.