
📑 Table of Contents ▶
- Bbq Bacon Mac ‘n’ Cheese Melt
- BBQ Bacon Mac ‘n’ Cheese Melt Essentials
- Fundamentals
- Preparation/Setup
- Crafting the BBQ Bacon Mac ‘n’ Cheese Melt
- Technique
- Tips/Tricks
- Achieving Perfection in Your BBQ Bacon Mac ‘n’ Cheese Melt
- Perfecting Results
- Troubleshooting/Variations
- Serving and Storing Your BBQ Bacon Mac ‘n’ Cheese Melt
- Serving/Presentation
- Pairings/Storage
- Conclusion
- FAQs – Bbq Bacon Mac ‘n’ Cheese Melt
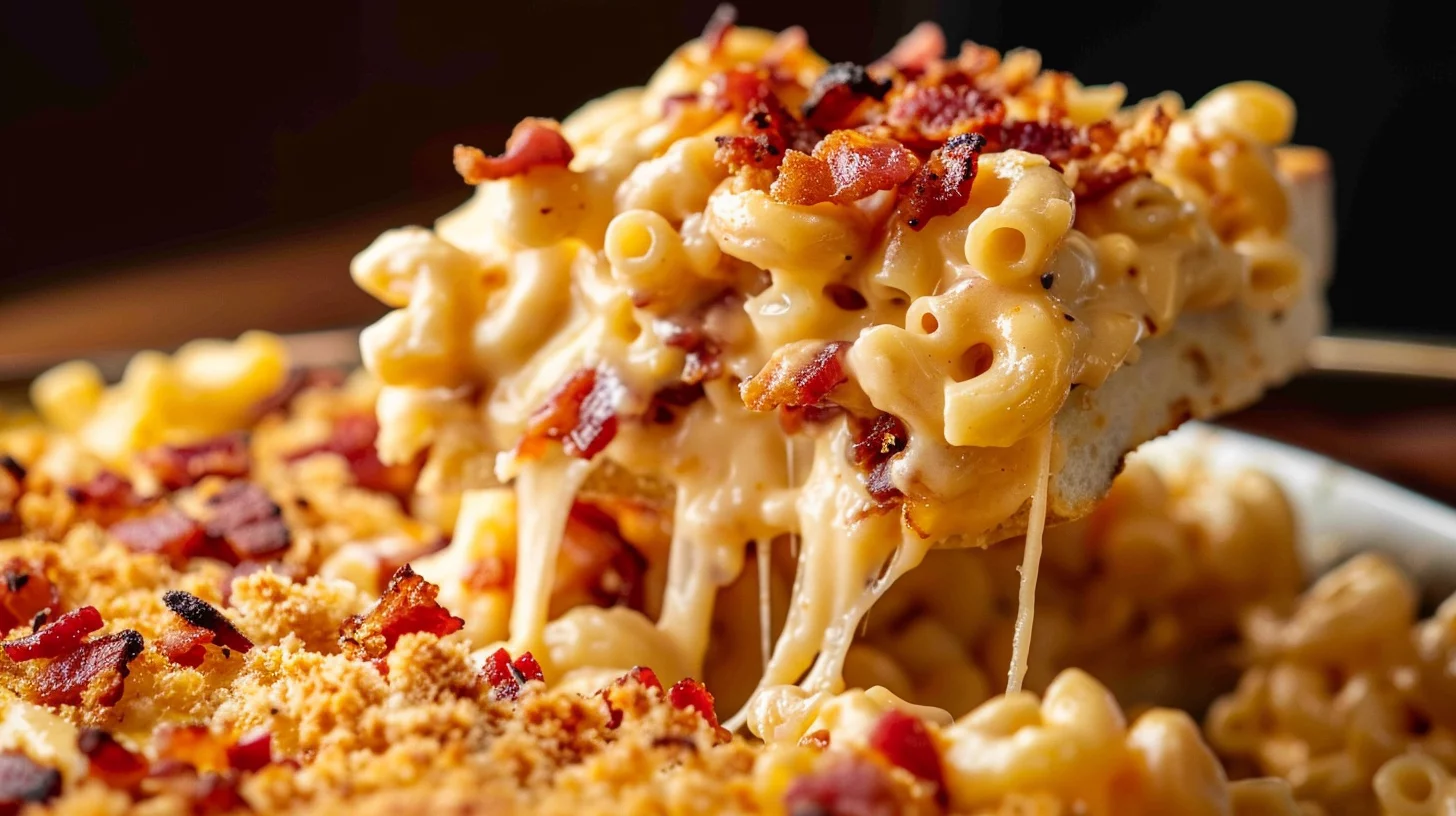
If the thought of a sizzling BBQ Bacon Mac ‘n’ Cheese Melt makes your mouth water, you’re in good company. One of my favorite kitchen memories involves a delightful twist on classic mac and cheese. I remember the first time I experimented with beef bacon—it was a game changer. The crispy, smoky flavor added an exciting new dimension to the dish, turning a simple mac and cheese into something truly special.
As I stood in the kitchen, stirring the bubbling pot of elbow macaroni, a delicious aroma filled the air. Mixing the cheeses and watching them melt smoothly into the creamy sauce was pure joy. The moment I combined the crispy beef bacon with the cheese sauce and pasta, I knew I’d created something unforgettable. If you’re like me and love a good BBQ Bacon Mac ‘n’ Cheese Melt, this recipe is sure to become a favorite in your home too.
The journey of cooking is filled with small victories, and crafting this BBQ Bacon Mac ‘n’ Cheese Melt is a testament to that. From the first sizzle of the beef bacon to the final golden topping, each step is a celebration of flavor and texture. The transformation of simple ingredients into a mouth-watering dish is a beautiful reminder of why cooking is such a cherished part of life.

Bbq Bacon Mac ‘n’ Cheese Melt
- Prep Time: 15 minutes
- Cook Time: 45 minutes
- Total Time: 60 minutes
- Yield: 6-8 servings
- Category: Main Course
- Method: Baking
- Cuisine: Italienne
Description
Discover the ultimate BBQ Bacon Mac ‘n’ Cheese Melt recipe! Learn how to create a mouthwatering, cheesy delight with perfectly crispy bacon in just a few simple steps.
Ingredients
- 1 pound (454 g) beef bacon diced
- 4 quarts water
- 1 pound (454 g) elb ow macaroni noodles
- 1 Tablespoon (15 ml) salt
- 6 Tablespoon (90 ml) s all-purpose flour
- 4 Tablespoon (60 ml) s butter divided use
- 4 cup (960 ml) s milk
- 1 cup (240 ml) heavy cream
- 1 teaspoon (5 ml) salt
- 1 teaspoon (5 ml) cracked black pepper
- 1/4 teaspoon (1 ml) red pepper flakes
- 2 cup (480 ml) s colb y jack cheese shredded
- 2 cup (480 ml) s sharp cheddar cheese shredded
- 1/2 cup (120 ml) moz zarella cheese shredded
Instructions
- Warm up your oven or grill to 425 degrees F.
- Boil the pasta. In a big pot, heat 4 quarts of water with salt until it boils rapidly. Add the elbow macaroni, stirring to ensure it doesn’t stick. Cook as per the package’s instructions, then strain.
- Prepare the beef bacon. In a large pan, fry the diced beef bacon until it’s crispy. Use a slotted spoon to transfer it to a paper towel-lined plate. Keep the grease in the pan.
- Create the roux. Into the hot bacon grease, mix in 2 Tablespoons of butter until it melts. Stir in the flour and cook on medium heat for 5-6 minutes until it starts to brown.
- Complete the cheese sauce. Pour the milk and heavy cream into the roux, bringing it back to a boil. Turn off the heat and incorporate the salt, cracked black pepper, and red pepper flakes.
- Melt the cheese into the sauce. Keep aside 1/2 cup each of colby jack and sharp cheddar cheese, along with the mozzarella. Mix the remaining colby jack and sharp cheddar cheese into the sauce and whisk until it is fully melted.
- Combine pasta with sauce. Once the macaroni is drained, return it to the large pot. Pour the cheese sauce over the pasta and add in half of the cooked beef bacon.
- Prepare the dish for baking. Use the remaining 2 Tablespoons of butter to grease a 9×13 baking dish or a 12″ cast iron skillet. Transfer the pasta and cheese mixture into the prepared dish. Sprinkle the reserved jack, cheddar, mozzarella cheese, and leftover bacon on top.
- Bake the dish. Cook the bacon mac and cheese in the oven or on the grill for 20 minutes, or until the edges are bubbling and the cheese begins to brown.
- Serve right away. Once done, remove from the heat and enjoy immediately!
Notes
- Cook beef bacon until crispy for added flavor and crunchnContinuously stir roux for smoothness before adding milk and creamnWhisk in cheese gradually for a creamy, smooth sauce
BBQ Bacon Mac ‘n’ Cheese Melt Essentials
Fundamentals
Creating the perfect BBQ Bacon Mac ‘n’ Cheese Melt starts with understanding the fundamentals. This dish combines the creamy allure of cheese sauce with the smoky delight of beef bacon. The elbow macaroni serves as the perfect canvas to carry these rich flavors. Selecting high-quality ingredients is key, especially when it comes to cheese and bacon. Using Colby Jack, sharp cheddar, and a touch of mozzarella ensures a balanced cheese profile, while crispy beef bacon adds a savory kick.
Preparation/Setup
Preparation is straightforward yet crucial. Begin by boiling the elbow macaroni in a large pot of salted water. While the pasta cooks, dice and fry the beef bacon until it reaches crispy perfection. This process not only cooks the bacon but also creates a flavorful base for your roux, thanks to the rendered bacon grease. The roux, a combination of butter and flour, serves as the thickening agent for the cheese sauce. Ensure you have all ingredients ready before you start cooking for a seamless experience.

Bbq Bacon Mac ‘n’ Cheese Melt
Crafting the BBQ Bacon Mac ‘n’ Cheese Melt
Technique
The technique for achieving a perfect BBQ Bacon Mac ‘n’ Cheese Melt lies in the sauce. Once the roux is ready, gradually incorporate milk and heavy cream, whisking continuously to avoid lumps. Bring this mixture to a boil, then reduce the heat and add seasonings including salt, cracked black pepper, and red pepper flakes. The sauce becomes the heart of the dish, infused with the flavors of the bacon and spices.
Tips/Tricks
To elevate your BBQ Bacon Mac ‘n’ Cheese Melt, consider these tips: Cook the roux until it’s golden brown to add depth to your sauce. Reserve some cheese and bacon for topping to create a deliciously crispy crust during baking. For an added smoky flavor, cook your bacon on a grill instead of a skillet. If you enjoy creative comfort food, you’ll definitely want to try these Bacon Cheeseburger Stuffed Tater Tot Cones — a fun twist on classic flavors.
Achieving Perfection in Your BBQ Bacon Mac ‘n’ Cheese Melt
Perfecting Results
Perfection in a BBQ Bacon Mac ‘n’ Cheese Melt is all about balance. Ensure your cheese sauce is neither too thick nor too thin; it should coat the back of a spoon smoothly. Bake your dish until the cheese on top is bubbly and golden brown. This not only enhances the flavor but also adds a delightful texture contrast.
Troubleshooting/Variations
If your sauce turns out too thin, simmer it a bit longer to thicken. If it becomes too thick, add a splash of milk to achieve the desired consistency. For variations, consider adding vegetables like broccoli or spinach for a nutritional boost. You can also explore other delightful recipes like Mushroom BBQ Bacon Cheeseburger Stuffed Peppers for a unique twist on classic ingredients.
Serving and Storing Your BBQ Bacon Mac ‘n’ Cheese Melt
Serving/Presentation
Presentation can elevate your BBQ Bacon Mac ‘n’ Cheese Melt from delicious to extraordinary. Serve it hot from the oven, allowing the cheese to pull enticingly as you scoop. A sprinkle of fresh herbs adds a touch of color and freshness. Pair this dish with a crisp side salad or some Garlic Bread Grilled Cheese for a comforting meal that pleases every palate.

Bbq Bacon Mac ‘n’ Cheese Melt
Pairings/Storage
While BBQ Bacon Mac ‘n’ Cheese Melt is a star on its own, it pairs wonderfully with a variety of sides. Consider serving it with grilled vegetables or a tangy coleslaw to balance the richness. Store leftovers in an airtight container in the refrigerator for up to three days. Reheat gently in the oven for best results, ensuring the cheese melts evenly. For more creative meal ideas, check out Chili Mac for a spicy twist on a classic.
Conclusion
The BBQ Bacon Mac ‘n’ Cheese Melt is a celebration of flavors and textures that promises to delight any crowd. By mastering the fundamentals, using proper techniques, and paying attention to details, you can create a dish that is both comforting and impressive. This recipe is versatile, allowing for playful variations and creative pairings. Whether you’re serving it for a family gathering or a quiet night in, the BBQ Bacon Mac ‘n’ Cheese Melt is sure to become a staple in your culinary repertoire.
