

📑 Table of Contents ▶
- Venison Prosciutto Or Salami
- Creating Your Own Venison Prosciutto or Salami
- Fundamentals
- Preparation/Setup
- Mastering Venison Curing Techniques
- Technique
- Tips/Tricks
- Perfecting Your Venison Prosciutto or Salami
- Perfecting Results
- Troubleshooting/Variations
- Serving and Storing Venison Prosciutto or Salami
- Serving/Presentation
- Pairings/Storage
- Conclusion
- FAQs – Venison Prosciutto Or Salami
When I first delved into the world of curing meats, I was both excited and a tad apprehensive. The idea of transforming a chunk of venison into something as delightful as venison prosciutto or salami felt daunting. But, as with many culinary adventures, it was the process that captivated me. It’s a bit like magic—combining simple ingredients and time to create something extraordinary. The moment you slice into your homemade venison prosciutto or salami, all the effort feels worth it.
There’s a certain joy in crafting your own cured meats. It reminds me of those messy, joy-filled kitchen moments I cherish. You begin with venison, sea salt, and a few other ingredients, and with careful preparation, you watch as it transforms. For anyone who loves experimenting with bold flavors, making venison prosciutto or salami is a rewarding journey. It’s a process that invites you to slow down, pay attention, and savor the anticipation.
Venison prosciutto or salami isn’t just about the end result. It’s about the story each link tells—the journey from raw venison to a richly flavored cured meat. Whether you’re a seasoned home cook or a curious beginner, this recipe offers a wonderful blend of tradition and creativity. As you work through each step, you’ll find yourself connecting with a craft that’s both timeless and deeply satisfying.
So, if you’re ready to embark on this culinary adventure, grab your venison and let’s dive into the art of making venison prosciutto or salami together. This is more than a recipe—it’s an experience that you’ll want to share with friends and family. And who knows, you might just find yourself falling in love with the process as much as the delicious results.
Print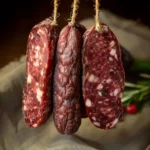
Venison Prosciutto Or Salami
- Prep Time: 30 minutes
- Cook Time: 24 hours
- Total Time: 24 hours 30 minutes
- Yield: 8 sausages
- Category: Main Course
- Method: Curing
- Cuisine: European
Description
Discover how to make delicious Venison Prosciutto or Salami at home with this easy recipe. Learn the steps to cure and age venison for a gourmet treat.
Ingredients
- 1 kilo venison meat
- 63 grams sea salt or kosher salt
- 6 grams curing salt no. 2 (sodium nitrate)
- 30 grams dextrose (or regular sugar)
- 20 grams minced garlic
- 20 grams minced fresh sage
- 6 grams freshly ground black pepper
- 5 grams minced juniper berries (optional )
- 10 grams starter culture T-SPX (see above)
- 1 cup (240 ml) cold distilled water
- Hog casings
Instructions
- Slice the venison into manageable chunks for your grinder, then blend them with the sea salt, curing salt, and dextrose. Refrigerate this mixture overnight to allow it to firm up, although this isn’t strictly required.
- Immerse approximately 10 feet of hog casings in lukewarm water. Combine the starter culture with the cold distilled water.
- When you’re ready, incorporate the garlic, sage, black pepper, and juniper berries into the meat mixture. Pass it through a medium grinder plate (6.5 mm). If the meat is largely free of tough tissues, this should suffice; otherwise, run it through the grinder once more.
- Ensure the meat’s temperature is below 40°F, ideally nearing freezing. Blend the starter culture solution with the meat and knead thoroughly by hand for 90 seconds to 2 minutes, until it coalesces and white streaks appear on the container’s sides.
- Transfer the mixture into the sausage stuffer, attaching a casing and leaving 4 inches of excess for tying. Fill a foot-long sausage, then pinch and slide the casing off the nozzle, leaving an 8-inch tail. Snip this in half to complete one link and begin another. Continue until all links are formed, likely about eight in total.
- Gently press each sausage to eliminate air pockets, tie one end, and trim the surplus. Press slightly more, puncture any remaining air bubbles with a needle, then tie the other end, keeping the extra length for hanging. Repeat for all the links.
- Secure the links onto “S” hooks and suspend them from the top rack in your oven, placing a tray underneath to catch drippings. Leave them for at least 24 hours, adhering to your starter culture’s specific instructions. Lightly mist the sausages twice daily during this period.
- Once the sausages attain a rich red hue and a pleasant cured aroma, transfer them to your drying area, maintaining conditions around 50°F and 75% humidity. Let them dry for a minimum of 3 weeks, though 6 weeks is preferable. After a month, test one link for firmness. They can be stored in the refrigerator indefinitely.
Notes
- Slice the venison into manageable chunks before blending with sea salt, curing salt, and dextrose for even flavor distribution.
- Incorporate garlic, sage, black pepper, and juniper berries evenly throughout the meat mixture to enhance the sausages’ overall flavor profile.
- Ensure the meat is below 40°F before blending with the starter culture solution to prevent premature fermentation and achieve desired texture and flavor in the sausages.
Creating Your Own Venison Prosciutto or Salami
Fundamentals
The foundation of venison prosciutto or salami lies in its ingredients. The core component is, of course, venison meat. Known for its lean yet rich flavor, venison offers a unique taste that makes it perfect for curing. The process begins with slicing the venison into manageable chunks. Adding sea salt and curing salt no. 2 ensures the meat is preserved safely, while dextrose or sugar provides a subtle sweetness that balances the savory elements.
Garlic, sage, and black pepper infuse the meat with aromatic flavors. Optionally, you can include minced juniper berries, which add a slightly piney, spicy note. The starter culture T-SPX is crucial for fermentation, as it helps develop the distinctive tang associated with cured meats. Cold distilled water acts as a medium to blend the starter culture evenly with the meat.
Preparation/Setup
Start by slicing the venison and blending it with sea salt, curing salt, and dextrose. Refrigerating this mixture overnight helps to firm it up, although it’s not strictly necessary. While the meat chills, prepare the hog casings by immersing them in lukewarm water. This ensures they remain pliable and easy to work with when stuffing the sausage.
Once ready, combine the starter culture with cold distilled water. This mixture will help kickstart the fermentation process. Next, incorporate the garlic, sage, black pepper, and juniper berries into the meat mixture. Pass this through a medium grinder plate to achieve the desired texture. If the meat still feels tough, a second grind may be necessary to ensure smoothness.
Keeping the meat’s temperature below 40°F is crucial during preparation. Ideally, it should be nearing freezing to prevent any unwanted bacterial growth. Blend the starter culture solution into the meat, kneading thoroughly by hand. This step ensures even distribution of flavors and the starter culture, setting the stage for successful fermentation.
Mastering Venison Curing Techniques
Technique
Mastering the technique of making venison prosciutto or salami involves a blend of precision and patience. Start by transferring the well-mixed meat into a sausage stuffer. Attach a casing, leaving a bit of excess for tying. Carefully fill the casing to form a foot-long sausage, ensuring you leave an 8-inch tail for tying off the ends.

Venison Prosciutto Or Salami
As you form each link, gently press to eliminate any air pockets. This step is crucial for maintaining the integrity of the sausage and ensuring even curing. Tie one end securely, trim the surplus, and repeat for all the links. This process may seem meticulous, but the attention to detail ensures the best possible outcome.
Tips/Tricks
When working with venison prosciutto or salami, always prioritize cleanliness and temperature control. Keeping the meat cold prevents the growth of unwanted bacteria, ensuring a safe curing process. Additionally, when tying the sausages, make sure they are tight but not overly compressed. The right balance allows for proper fermentation and drying.
To puncture any remaining air bubbles, use a sterilized needle. This simple step can make a significant difference in the final texture of your cured meats. Finally, as your sausages hang and dry, the conditions of your drying area play a crucial role. Aim for a consistent environment around 50°F with 75% humidity for optimal results.
Perfecting Your Venison Prosciutto or Salami
Perfecting Results
Achieving perfection in venison prosciutto or salami requires patience and observation. As your sausages dry, monitor their color and aroma. A rich red hue and a pleasant, cured scent indicate successful fermentation. This stage can last anywhere from 3 to 6 weeks, depending on your preference and environmental conditions.
Testing a link after a month provides insight into the texture and flavor development. The sausage should feel firm yet yielding, with a well-balanced taste. Adjusting drying times based on personal preference allows for a tailored flavor profile, making your homemade venison prosciutto or salami uniquely yours.
Troubleshooting/Variations
If you encounter issues during the curing process, don’t be discouraged. Common problems like uneven drying or off-flavors can often be traced back to temperature or humidity fluctuations. Adjusting these factors can help remedy the situation. Additionally, experimenting with different herbs or spices, such as adding extra juniper berries or substituting sage with rosemary, can lead to exciting flavor variations.
Remember, each batch of venison prosciutto or salami tells a different story. Embrace the learning curve and enjoy the process of refining your technique. With each attempt, you’ll gain valuable insights that bring you closer to your ideal cured meat.
Serving and Storing Venison Prosciutto or Salami
Serving/Presentation
When it comes to serving venison prosciutto or salami, presentation is key. Thinly slice the cured meats to showcase their beautiful marbling and rich color. Arrange the slices on a platter, perhaps with a selection of cheeses or fresh fruits, to complement the flavors.
Venison prosciutto or salami pairs wonderfully with a variety of accompaniments. Consider serving it alongside homemade cheese sauce for broccoli or with a simple side of crusty bread. The goal is to highlight the unique taste of the venison while offering contrasting textures and flavors.
Pairings/Storage
For storage, venison prosciutto or salami can be kept in the refrigerator indefinitely, where it will continue to develop flavor over time. Properly wrapped in parchment or wax paper, it retains its quality and taste. When ready to enjoy, allow the slices to come to room temperature for the best flavor experience.

Venison Prosciutto Or Salami
Experiment with serving your venison creations alongside dishes like North Carolina Butter Venison Backstrap for a themed culinary experience. Pairing it with different courses can enhance the meal’s overall appeal, offering a gourmet touch to your dining table.
Conclusion
Creating venison prosciutto or salami at home is a fulfilling endeavor that combines tradition and creativity. This process not only results in delicious cured meats but also strengthens your skills as a home cook. From selecting quality venison to mastering the art of curing, each step enhances your understanding of this timeless practice.
The journey from raw venison to a robustly flavored cured meat showcases the magic of culinary transformation. Whether served on its own or as part of a larger meal, venison prosciutto or salami is sure to impress. As you refine your technique, you’ll find endless possibilities for flavor variations and pairings, making each creation uniquely yours.
Embrace the adventure and enjoy the fruits of your labor. With patience and practice, you’ll discover the joy of crafting your own cured meats, bringing a touch of artisanal flair to your home kitchen. So, gather your ingredients and embark on the delicious journey of making venison prosciutto or salami.
