
📑 Table of Contents ▶
Sourdough Bread
The first time I attempted to bake sourdough bread, I remember the excitement bubbling within me. I had always admired the art of bread-making, particularly the way sourdough seemed to carry a personality of its own. I followed the recipe closely, eager to see how my own loaf would turn out. As I combined the flour and water, the dough felt alive in my hands.
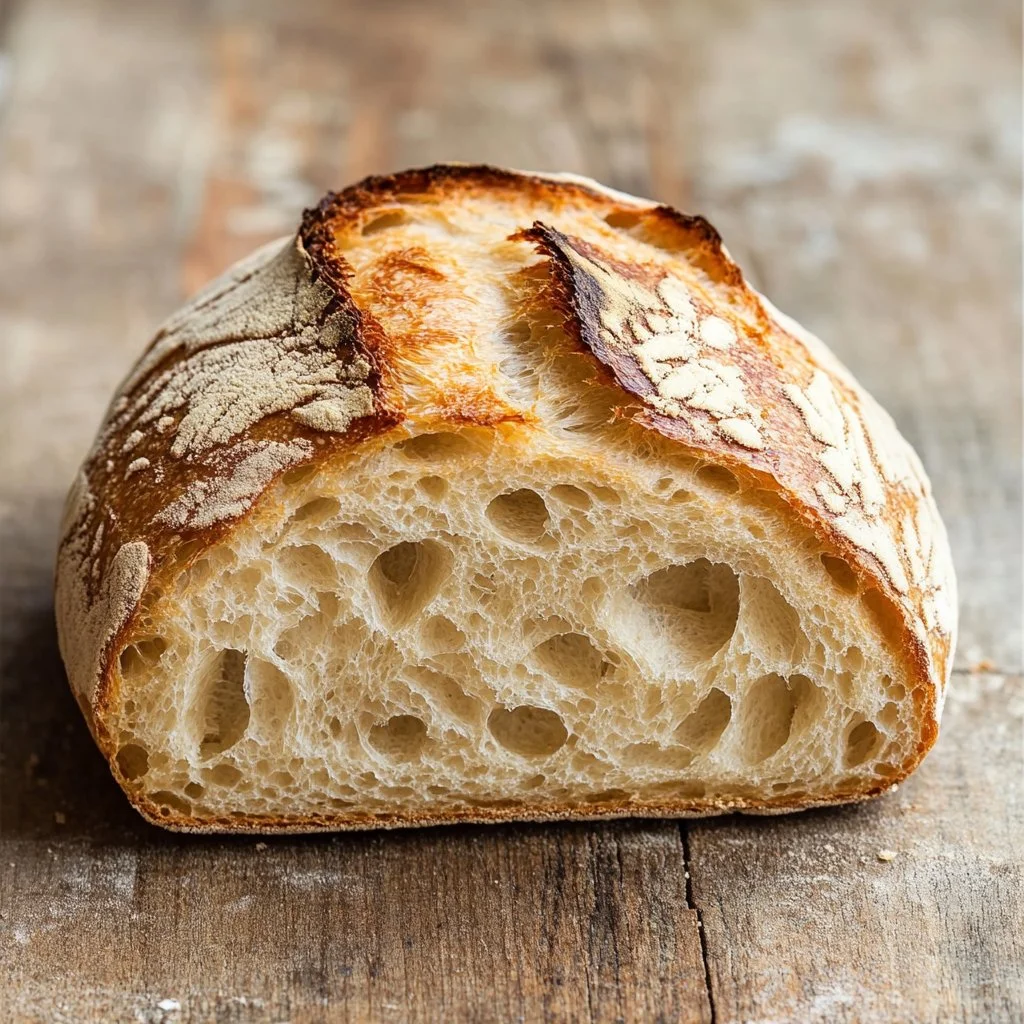
After a few hours of waiting and folding, the moment finally arrived. I shaped my dough and placed it in a banneton, observing how it puffed up like a living creature. Baking it transformed my kitchen into a cozy haven filled with the warm aroma of freshly baked bread. That first bite was nothing short of magical, a crispy crust welcoming a fluffy interior. This was not just a loaf; it was an experience, a testament to patience and the natural fermentation process. Sourdough bread became a beloved staple in my home, filling my heart and my table with warmth.
Baking sourdough bread might seem intimidating, but this journey is rewarding and satisfying. In this guide, discover the fundamentals, techniques, and tips that will elevate your bread-baking game. Let’s dive into the world of sourdough bread together.
Understanding Sourdough Bread
Fundamentals
Sourdough bread stands apart because of its unique fermentation process. The rising action comes from wild yeast and bacteria present in your starter, rather than commercial yeast. This duo of microorganisms creates not only a fantastic rise but also a depth of flavor that commercial breads often lack.
Baking sourdough connects you to traditions that span centuries. Each loaf carries a story, from the beginning of its rise to the moment it leaves the oven. The science behind sourdough is fascinating; the lactic acid bacteria develop tangy notes over time while ensuring a chewy texture. The crust gains that iconic crispiness from the steam created in the Dutch oven during baking.
Preparation/Setup
To prepare for making sourdough bread, gather your ingredients and tools. For a successful bake, you’ll need 500g of bread flour, 350ml of water, 100g of active sourdough starter, and 10g of salt. Ensure your sourdough starter is active and bubbly before you start; this is critical for good fermentation.
Set up a spacious work area. You will also need a large mixing bowl, a scale for accuracy, a banneton for proofing, and a Dutch oven for baking. A bench scraper is handy for working with sticky dough. Prepare your tools and feel free to put on some music to enjoy the process even more.
Ingredients
- Bread Flour (500g): This high-protein flour provides the structure necessary for a great rise.
- Water (350ml): Room temperature water activates the starter and combines with the flour efficiently.
- Active Sourdough Starter (100g): This is your source of natural yeast. Keep it bubbly and lively for best results.
- Salt (10g): Salt not only enhances flavor but also strengthens the gluten structure.
Directions
- In a large bowl, combine the bread flour and water. Mix until no dry flour remains, and let it rest for 30 minutes (autolyse).
- Add the sourdough starter and salt to the dough, and mix by hand or with a dough mixer until well incorporated.
- Let the dough rise at room temperature for about 4-6 hours, folding it every 30 minutes during the first 2 hours.
- Shape the dough and place it in a well-floured banneton. Cover and let it proof for another 1-2 hours.
- Preheat your oven to 250°C (482°F) with a Dutch oven inside.
- Carefully transfer the dough to the Dutch oven, cover, and bake for 30 minutes.
- Remove the lid and bake for an additional 15-20 minutes, until golden brown.
- Let it cool completely before slicing.
Mastering Sourdough Bread Techniques
Technique
Making sourdough bread is as much about technique as it is about ingredients. Pay close attention to your folding method, as this helps develop the gluten structures necessary for a good rise. When you first mix the flour and water, you’ll create a shaggy dough. Letting this dough rest during autolyse allows the flour to hydrate, which enhances gluten development.
During the rise, keep your dough covered to retain moisture. Folding every thirty minutes during the initial two hours incorporates air and strengthens the dough. As the dough rises, it should become lighter and more elastic, indicating that fermentation is taking place successfully.
Tips/Tricks
- Timing is Everything: Let your dough rise based on its appearance and feel, not just the clock. The dough should roughly double in size.
- Temperature Control: Warmer environments expedite fermentation; a cool kitchen will slow the process. Adjust your timings as necessary.
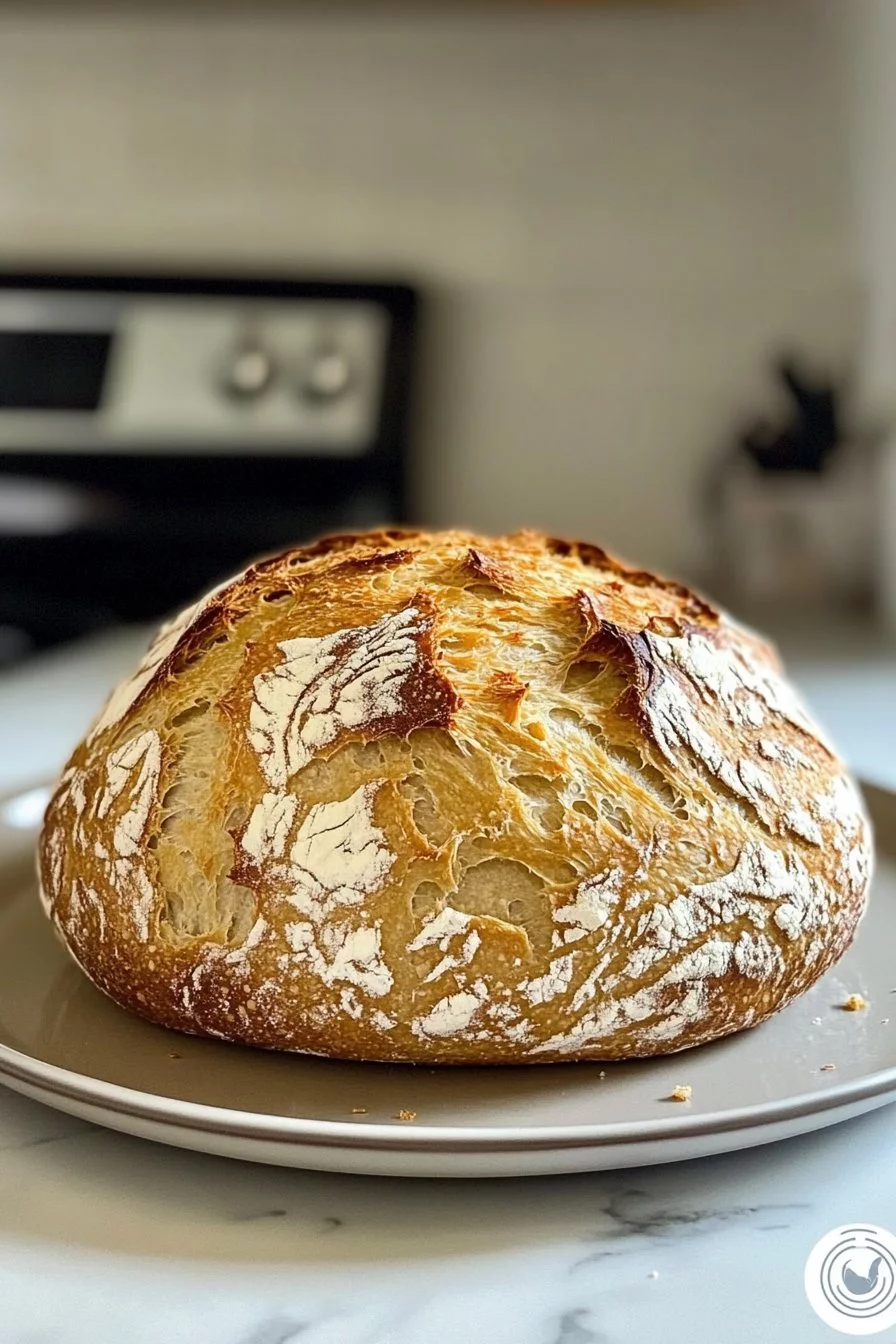
- Banneton Care: Utilize a well-floured banneton for shaping your dough. This helps produce a beautiful pattern on your loaf and supports its structure.
- Experiment: Once you feel comfortable with the basic recipe, experiment with different flours. Whole wheat or rye flour can add interesting flavors and textures.
Perfecting Your Sourdough Results
Perfecting Results
After several bakes, you may want to fine-tune your sourdough bread. Capturing the perfect crust-shape ratio comes down to practice and observation. Your goal is to achieve a beautifully browned crust while maintaining a fluffy, chewy interior.
Consider adjusting your hydration levels as well. A dough with slightly higher water content can yield a more open crumb, while a lower hydration dough offers more structure. This experimentation leads to discovering your personal sourdough heaven.
Troubleshooting/Variations
Challenges often arise when baking sourdough bread. If your loaf does not rise as expected, check the activity level of your sourdough starter. An underactive starter leads to denser bread.
If your crust turns out too hard, try reducing the baking time or lowering the temperature slightly. On the other hand, if you desire a darker crust, extend the bake or raise the heat. Adjustments may feel intimidating, but they can significantly enhance your baking experience.
Serving and Storing Sourdough Bread
Serving/Presentation
Once you’ve baked that beautiful loaf, slice it carefully. Use a serrated knife for best results. Serve it warm, either as-is or toasted for a delightful crunch. Sourdough pairs wonderfully with spreads, cheeses, or even savory toppings.
The remarkable tang of sourdough also complements various meals. Consider using it for sandwiches, or as a side with soups and salads.
Pairings/Storage
Sourdough bread deserves to be stored carefully to maintain freshness. Wrap the loaf in a kitchen towel and place it in a paper bag to help regulate moisture. You can also slice the bread and store it in an airtight container if you prefer. Freeze any leftovers to extend shelf life—just pop it in the toaster when ready to enjoy.
Baking sourdough bread becomes an enriching experience, connecting you with tradition while satisfying your culinary creativity. Embrace the art, enjoy the process, and savor the delicious results.
The journey doesn’t end with one successful bake; it unfolds with each loaf you make, bringing a sense of accomplishment to your kitchen. Embrace the challenge and share your sourdough with loved ones.
Print
Sourdough Bread
- Prep Time: 30 minutes
- Cook Time: 50 minutes
- Total Time: 80 minutes
- Yield: 1 loaf
- Category: Bakery
- Method: Baking
- Cuisine: French
- Diet: Vegetarian
Description
A delectable sourdough bread crafted through natural fermentation, yielding a crispy crust and a fluffy interior.
Ingredients
- 500g Bread Flour
- 350ml Water
- 100g Active Sourdough Starter
- 10g Salt
Instructions
- In a large bowl, combine the bread flour and water. Mix until no dry flour remains, and let it rest for 30 minutes (autolyse).
- Add the sourdough starter and salt to the dough, and mix by hand or with a dough mixer until well incorporated.
- Let the dough rise at room temperature for about 4-6 hours, folding it every 30 minutes during the first 2 hours.
- Shape the dough and place it in a well-floured banneton. Cover and let it proof for another 1-2 hours.
- Preheat your oven to 250°C (482°F) with a Dutch oven inside.
- Carefully transfer the dough to the Dutch oven, cover, and bake for 30 minutes.
- Remove the lid and bake for an additional 15-20 minutes, until golden brown.
- Let it cool completely before slicing.
Notes
Ensure your sourdough starter is active and bubbly before starting. Timing is critical – let your dough rise based on its appearance and feel.
