
📑 Table of Contents ▶
- The Essentials of Rustic Italian Crusty Bread
- Fundamentals
- Preparation/setup
- Directions
- Mastering the Art of Rustic Bread
- Technique
- Tips/tricks
- Perfecting Your Rustic Italian Bread
- Perfecting results
- Troubleshooting/variations
- Serving Rustic Italian Crusty Bread
- Serving/presentation
- Pairings/storage
- Rustic Italian Crusty Bread
Rustic Italian Crusty Bread Recipe
Baking rustic Italian crusty bread has always held a special place in my heart. I can still remember the first time I tasted a loaf fresh out of the oven, its crisp crust crackling as I tore it apart. As the warm aroma filled the kitchen, I felt a sense of comfort and familiarity. This bread represents more than just food; it’s a symbol of togetherness, often shared during family meals.
The beauty of rustic Italian bread lies in its simplicity. With just a handful of ingredients, you can create something extraordinary. Gathering around a table, sharing stories, and savoring the fresh, crusty bread brings people closer. This recipe strives to encapsulate that very experience, making it accessible to everyone eager to try their hand at bread-making.
As you embark on this baking journey, remember that the process itself is a cherished tradition. Each step invites you to engage with the ingredients, creating a connection that goes beyond the final product. Rustic Italian crusty bread is more than a treat; it’s an experience steeped in warmth, community, and flavor.
The Essentials of Rustic Italian Crusty Bread
Fundamentals
The foundational elements of rustic Italian crusty bread comprise just four ingredients: all-purpose flour, sea salt, warm water, and yeast. This simple combination allows the bread to shine while also providing the opportunity to tweak textures or flavors to meet personal preferences. This bread thrives on its rustic nature, boasting a hearty, chewy crust and a soft, airy interior.
Understanding the role of each ingredient is crucial. The yeast acts as the leavening agent, helping the bread to rise and develop a light texture. The sea salt enhances flavor while also restricting the yeast’s speed, ensuring a slow fermentation that builds taste. Water holds everything together, and its warmth activates the yeast, kick-starting the entire process.
Preparation/setup
To get started, gather all necessary ingredients: 3.25 cups of all-purpose flour, 1 teaspoon of sea salt, 1.5 cups of warm water, and 2 teaspoons of instant yeast. Find a spacious mixing bowl or a kitchen stand mixer to facilitate your mixing and kneading. A warm, draft-free area will be essential for the dough to rise effectively, so setting your space beforehand will simplify the entire process.
Prepare your tools by ensuring your workspace is clean and organized. Use a spatula or a paddle attachment for your mixer. A sharp knife will also be handy later for scoring the dough. Don’t forget about flour for dusting your work surface and hands to manage the sticky dough easily.
Ingredients
- 3.25 cups all-purpose flour (plus more for dusting)
- 1 teaspoon sea salt
- 1.5 cups warm water
- 2 teaspoons instant yeast (or active dry yeast)
Directions
- In a large mixing bowl, combine the flour, sea salt, and yeast. Use a spatula or the paddle attachment on your mixer to mix them thoroughly.
- Gradually pour in the warm water, continuing to mix until a soft dough forms. It may stick to the bottom of the bowl, but this is perfectly normal and expected.
- Cover the bowl loosely with plastic wrap and a tea towel. Let the dough rise at room temperature for 2 to 3 hours, or until it doubles in size.
- Lightly sprinkle flour on your kitchen counter and transfer the dough onto the floured surface. Flour your hands and don’t worry if the dough is sticky; this is part of the process.
- With floured hands, fold the dough onto itself, shaping it into a round ball. Avoid kneading or extensive handling.
- Use a sharp knife to lightly carve an "X" into the top of the loaf, or simply make a few shallow cuts across the top.
- Place the shaped dough onto a lightly floured pizza peel, cardboard, or parchment paper, and let it rest while your oven heats up.
Mastering the Art of Rustic Bread
Technique
The crafting of rustic Italian bread requires patience and a little practice. The key lies in understanding the techniques involved, particularly during mixing and shaping. Mixing the ingredients until just combined avoids overworking the dough, which can lead to a denser bread.
When shaping, the fold-and-tuck method helps develop gluten without kneading. This gentle handling allows for the creation of air pockets, which results in a light, airy crumb. The scoring on top allows the bread to expand properly in the oven while adding a beautiful, rustic touch to its appearance.
Tips/tricks
A few tips can enhance your bread-making experience. Always ensure your ingredients are fresh, particularly the yeast. A quick test with warm water can verify its activity. If the yeast foams after mixing it with water, it’s good to go.
When it comes to baking, an oven thermometer ensures accurate temperature readings, crucial for achieving that golden crust. Preheating your oven with a pizza stone inside promotes even heat distribution, making all the difference in how the bread cooks.
Consider experimenting with different flours like whole wheat or adding herbs to the dough for unique flavor profiles. Each variation can give your rustic Italian crusty bread a personal twist.
Perfecting Your Rustic Italian Bread
Perfecting results
Achieving the perfect rustic Italian crusty bread is often a result of practice and attention to detail. The initial rise is crucial; you want to allow enough time for the dough to develop flavors. If time permits, a longer fermentation can enhance the overall taste and texture.
Baking times vary, but look for that visually appealing golden-brown crust. A food thermometer can ensure the internal temperature reaches approximately 200°F, confirming the bread is fully cooked.
Troubleshooting/variations
Some common issues may arise during the bread-making process. If your bread is too dense, it could be due to insufficient rising time or under-activated yeast. On the flip side, if the crust is too hard, consider reducing the baking time or allowing for a less aggressive preheat of the oven.
Variations abound in rustic bread making. Incorporate seeds, cheese, or dried fruits for added flavor. Experiment with different types of flour, always keeping in mind that hydration levels may need adjusting.
Serving Rustic Italian Crusty Bread
Serving/presentation
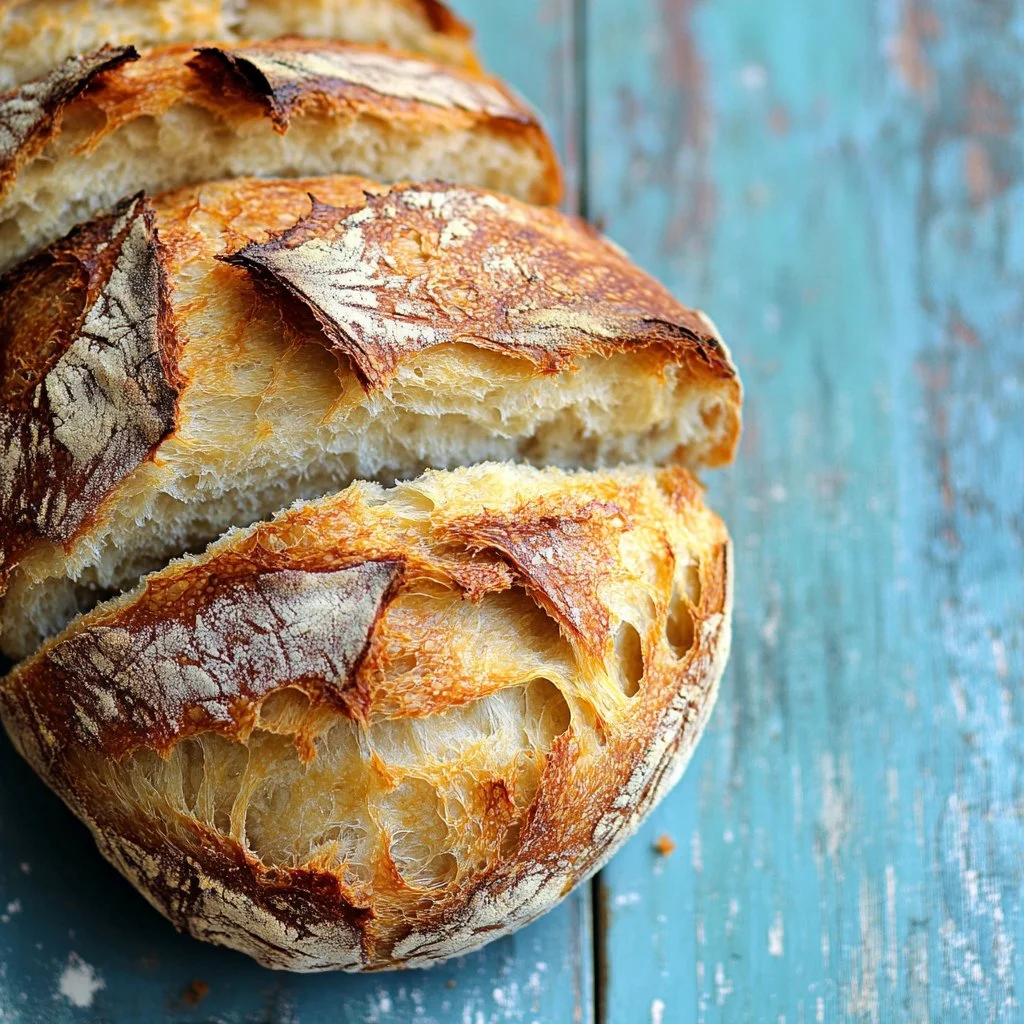
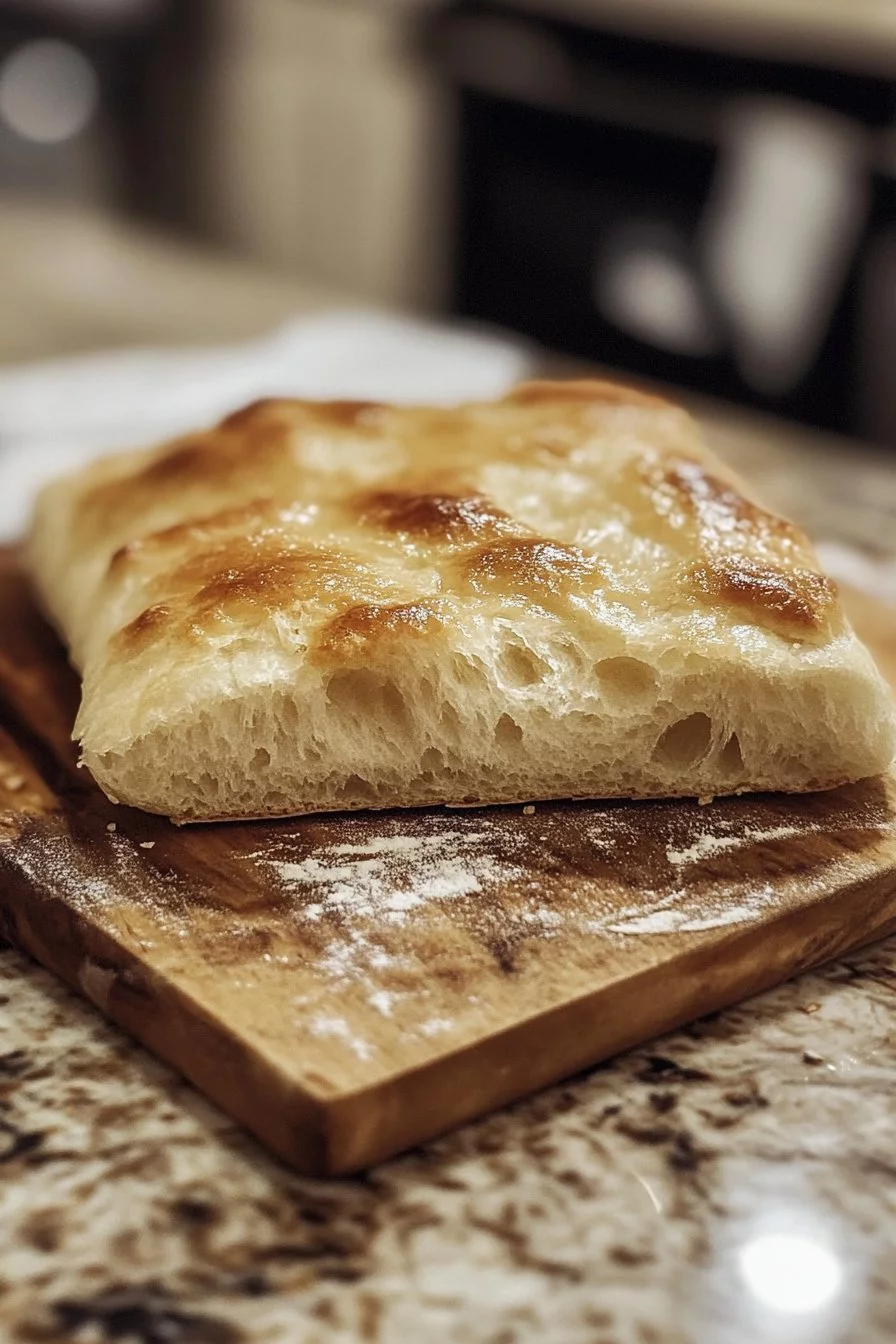
Once your rustic Italian crusty bread cools completely, slice it to reveal its inviting texture. The crust should crackle when cut, while the interior remains soft and appealing. Pair it with a variety of spread options, like flavored oils, butters, or even hearty soups for a standout dish.
Serving the bread on a wooden cutting board or a rustic bread basket adds to the presentation. Consider garnishing with fresh herbs for an elegant touch that complements its homemade charm.
Pairings/storage
Rustic Italian crusty bread lends itself well to a myriad of pairings. Use it for bruschetta, serve alongside a cheese platter, or enjoy with a rich stew. The possibilities are endless.
When it comes to storage, keep the bread wrapped in a clean kitchen towel or in a paper bag to maintain its crustiness. If you must store it longer, freeze slices to preserve freshness—perfect for enjoying homemade bread any time.
The process of crafting rustic Italian crusty bread is an enriching experience, connecting tradition with flavor. As you savor each bite, you embrace a culinary heritage that speaks of togetherness and joy. This bread is more than just a recipe; it’s an invitation to create moments that linger long after the last crumb is gone.
Print
Rustic Italian Crusty Bread
- Prep Time: 30 minutes
- Cook Time: 30 minutes
- Total Time: 180 minutes
- Yield: 1 loaf
- Category: Bread
- Method: Baking
- Cuisine: Italian
- Diet: Vegetarian
Description
A simple yet flavorful rustic Italian bread with a crispy crust and soft interior, perfect for sharing during family meals.
Ingredients
- 3.25 cups all-purpose flour (plus more for dusting)
- 1 teaspoon sea salt
- 1.5 cups warm water
- 2 teaspoons instant yeast (or active dry yeast)
Instructions
- In a large mixing bowl, combine the flour, sea salt, and yeast. Use a spatula or the paddle attachment on your mixer to mix them thoroughly.
- Gradually pour in the warm water, continuing to mix until a soft dough forms.
- Cover the bowl loosely with plastic wrap and a tea towel. Let the dough rise at room temperature for 120 to 180 minutes, or until it doubles in size.
- Lightly sprinkle flour on your kitchen counter and transfer the dough onto the floured surface. Fold the dough onto itself, shaping it into a round ball.
- Use a sharp knife to carve an ‘X’ into the top of the loaf.
- Place the shaped dough onto a lightly floured surface and let it rest while your oven heats up.
Notes
Ensure all ingredients are fresh, particularly the yeast. A quick test with warm water can verify its activity.
