

📑 Table of Contents ▶
- The Essentials of Rustic Italian Crusty Bread
- Fundamentals
- Preparation/Setup
- Directions
- Mastering the Art of Rustic Italian Crusty Bread
- Technique
- Tips and Tricks
- Perfecting Rustic Italian Crusty Bread
- Perfecting Results
- Troubleshooting and Variations
- Presenting Rustic Italian Crusty Bread
- Serving and Presentation
- Pairings and Storage
Rustic Italian Crusty Bread
Rustic Italian crusty bread holds a special place in my heart and kitchen. The first time I baked this bread, the aroma wafted through the house, igniting memories of cozy family gatherings around the dinner table. Watching the loaf rise, its golden crust forming beautifully in the oven, created an irresistible anticipation.
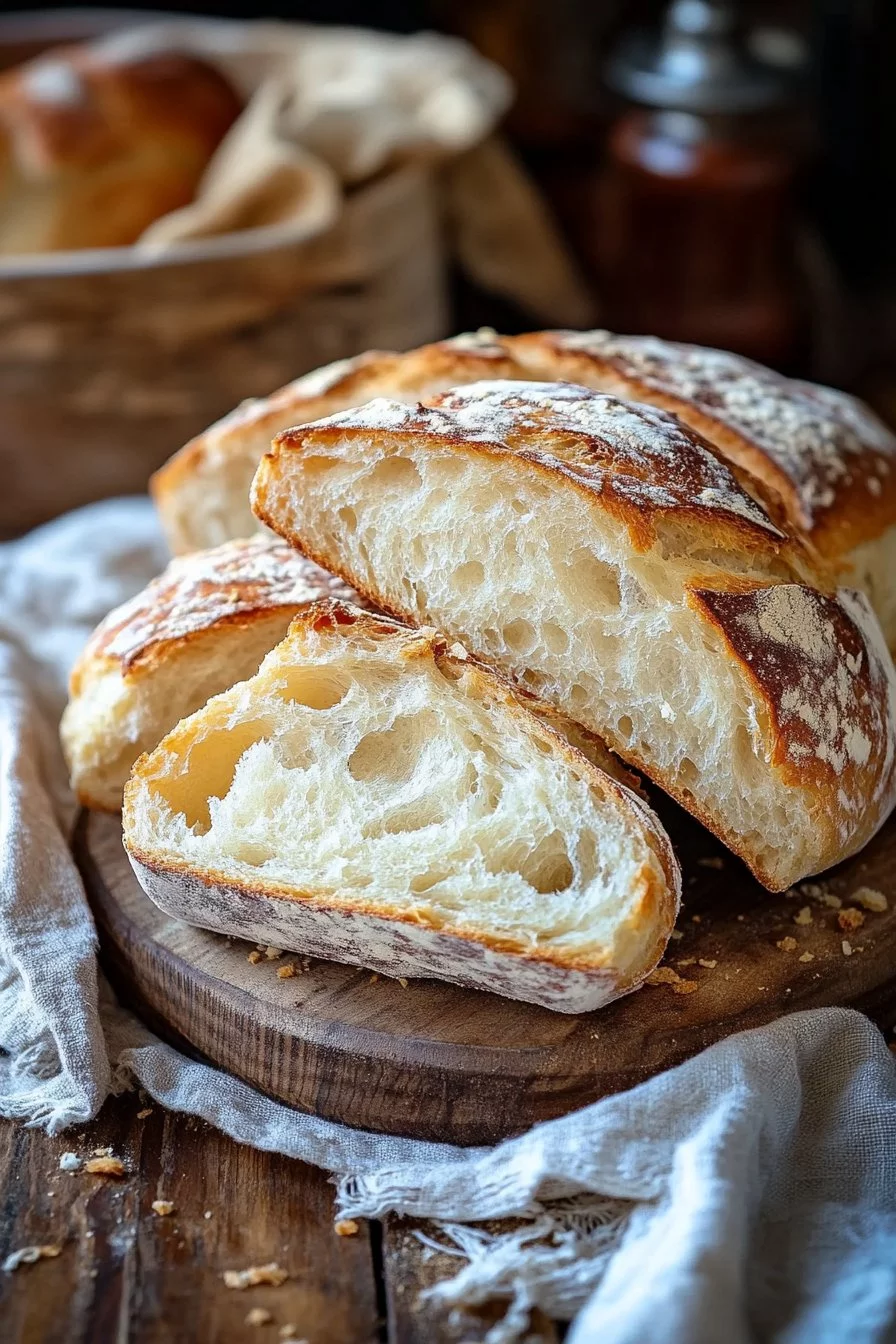
Sharing slices with family, slathered with butter or enjoyed with a simple olive oil dip, brought out smiles and heartfelt "Mmm’s." Each bite revealed a chewy interior and a crusty exterior that perfectly balanced texture and flavor. Crafting this rustic bread has become an essential ritual in my kitchen, deeply connecting me to the traditions of Italian cooking.
The process of making this rustic Italian bread is both simple and rewarding. It doesn’t require complicated techniques, just patience and a few basic ingredients. If you had asked me years ago whether I could bake bread, I would have hesitated. But now, with each bake, I feel a sense of accomplishment and pride. Baking this bread fills not only the kitchen but also the heart with comfort and joy.
The Essentials of Rustic Italian Crusty Bread
Fundamentals
Creating rustic Italian crusty bread starts with understanding the basic principles of bread-making. The foundation of this bread lies in its ingredients: flour, salt, sugar, yeast, and warm water. Each component plays a crucial role in developing the flavor and texture of the final product.
Flour provides the structure, while salt controls fermentation and enhances flavor. Yeast serves as the engine, converting sugars into carbon dioxide and causing the dough to rise. Water is the glue that binds everything together and affects the dough’s consistency. Understanding these fundamentals lays the groundwork for successful bread-making.
Preparation/Setup
Preparing to bake involves gathering all necessary ingredients and tools. Start with 3 1/2 cups of all-purpose or bread flour, 1 1/2 teaspoons of salt, 1 teaspoon of sugar, one packet of instant yeast (2 1/4 teaspoons), and 1 1/4 cups of warm water (110°F to 115°F).
Make sure you also have mixing bowls, a wooden spoon, a kitchen towel, and a Dutch oven or baking stone ready. This setup ensures a seamless baking experience, allowing you to focus on the process and enjoy creating your rustic bread without interruptions.
Ingredients
- 3 1/2 cups all-purpose or bread flour
- 1 1/2 teaspoons salt
- 1 teaspoon sugar
- 1 packet (2 1/4 teaspoons) instant yeast
- 1 1/4 cups warm water (110°F to 115°F)
Directions
-
Activate the Yeast: In a small bowl, combine the warm water, sugar, and yeast. Allow it to sit for 5–10 minutes until it becomes foamy. This signifies that the yeast is active and ready to work its magic.
-
Mix the Dough: In a large mixing bowl, combine the flour and salt. Pour in the yeast mixture and stir with a wooden spoon until a shaggy dough forms.
-
Knead the Dough: Turn the dough out onto a lightly floured surface. Knead for about 8–10 minutes until smooth and elastic. Alternatively, use a stand mixer with a dough hook attachment for 5–6 minutes.
-
First Rise: Place the dough in a lightly oiled bowl. Cover with a clean kitchen towel and place it in a warm area. Let it rise for 1–2 hours until it doubles in size.
-
Shape the Loaf: Punch down the dough and shape it into a round loaf. Place it on a piece of parchment paper.
-
Second Rise: Cover the loaf with a kitchen towel. Let it rise for another 30–45 minutes while preheating your oven to 450°F with a Dutch oven or baking stone inside.
-
Bake the Bread: Carefully transfer the dough on the parchment paper into the preheated Dutch oven. Cover with the lid and bake for 30 minutes. Remove the lid and bake for an additional 10–15 minutes until the crust is golden brown.
-
Cool and Serve: Remove the bread from the oven and transfer to a cooling rack. Allow it to cool completely before slicing.
Mastering the Art of Rustic Italian Crusty Bread
Technique
The technique behind making rustic Italian crusty bread is straightforward yet critical. The fermentation process contributes significantly to the flavor complexity. During the first rise, the yeast ferments the sugars in the flour, producing gas that inflates the dough. When you punch down the dough, this action redistributes the yeast and gas pockets, creating a well-aerated structure in the finished bread.
Kneading is another vital technique. Knead the dough adequately to develop gluten, which is essential for achieving the desired elasticity and chewy texture. A well-kneaded dough will be smooth and elastic, making it easier to shape.
Tips and Tricks
To enhance the flavor of your rustic Italian crusty bread, experiment with different types of flour or add herbs and spices. For instance, incorporating a bit of whole wheat flour can add a nutty flavor. Additionally, allowing the dough to rise longer can deepen the flavor profile.
Ensure your dough remains in a warm environment during the rising process. If your kitchen is cold, consider using a turned-off oven with the light on or a warm corner of your house. A warm and humid environment encourages yeast activity and helps develop the bread’s texture and flavor.
Perfecting Rustic Italian Crusty Bread
Perfecting Results
To achieve the perfect rustic Italian crusty bread, focus on timing and temperature. Each stage in the dough’s development contributes to rising and baking. If the dough rises too slowly, place it in a warmer location. Conversely, if it rises too quickly, it may lose structure.
The baking temperature is also crucial. Preheating the oven with a Dutch oven creates a steamy environment that promotes a crispy crust. This technique helps develop the perfect outer layer while keeping the inside soft and tender.
Troubleshooting and Variations
Bread-making is an art that sometimes requires adjustment. If your bread rises unevenly or seems dense, check yeast freshness. If the dough feels too wet, add a bit more flour during kneading until you achieve the right consistency.
Consider variations by adding cheeses, nuts, or seeds to the dough for added flavor and texture. Each tweak creates a unique version of this classic bread, making it a versatile centerpiece for any meal.
Presenting Rustic Italian Crusty Bread
Serving and Presentation
When serving rustic Italian crusty bread, presentation matters. A simple yet elegant way to serve it is to place the loaf on a rustic wooden board. Slice it into thick sections to showcase the airy interior.
Serving with olive oil and various dipping spices invites guests to personalize their experience. A small dish of herbed oil adds a delightful touch, allowing those flavors to shine alongside your bread.
Pairings and Storage
Rustic Italian crusty bread pairs fabulously with soups, salads, and charcuterie boards. Its versatility allows it to complement a wide range of cuisines and meals. Use it for dipping or as a vehicle for savoring spreads and toppings.
Proper storage is essential to maintaining freshness. Keep the bread in a paper bag at room temperature for up to three days. For longer storage, wrap it tightly in plastic wrap and place it in the freezer. This bread can be frozen for up to three months.
Rustic Italian crusty bread brings warmth and comfort to any meal. Making it from scratch isn’t just a cooking project; it’s a delightful journey. Dive into this experience, and let every bite transport you to a cozy Italian kitchen.
Print
Rustic Italian Crusty Bread
- Prep Time: 15 minutes
- Cook Time: 40 minutes
- Total Time: 55 minutes
- Yield: 1 loaf
- Category: Bread
- Method: Baking
- Cuisine: Italian
- Diet: Vegetarian
Description
A delicious and rewarding rustic Italian bread with a chewy interior and a crispy crust, perfect for sharing with family.
Ingredients
- 3 1/2 cups all-purpose or bread flour
- 1 1/2 teaspoons salt
- 1 teaspoon sugar
- 1 packet (2 1/4 teaspoons) instant yeast
- 1 1/4 cups warm water (110°F to 115°F)
Instructions
- In a small bowl, combine warm water, sugar, and yeast; let sit for 5–10 minutes until foamy.
- In a large mixing bowl, combine flour and salt. Add yeast mixture and stir until a shaggy dough forms.
- Turn the dough onto a floured surface and knead for 8–10 minutes or 5–6 minutes with a stand mixer.
- Place dough in an oiled bowl, cover with a kitchen towel, and let rise for 1–2 hours until doubled in size.
- Punch down the dough and shape into a round loaf on parchment paper.
- Cover and let rise for another 30–45 minutes while preheating oven to 450°F.
- Transfer the loaf in parchment into the preheated Dutch oven, cover, and bake for 30 minutes. Remove lid and bake for another 10–15 minutes until golden brown.
- Cool on a rack before slicing.
Notes
Experiment with different flours or add herbs for varied flavors. Ensure warm rising conditions for best results.
