
📑 Table of Contents ▶
Protein Balls
Discovering healthy snacks can feel like a challenge, especially when you crave something satisfying yet nutritious. Protein balls have become a favorite solution in my household. They are not just energy boosts, but they also taste incredible!
Every weekend, we whip up a batch of protein balls, perfect for a quick snack or a post-workout treat. The rich flavors of cashew butter and chocolate protein powder blend wonderfully, creating a delightful experience for the taste buds. Each bite packs a punch of nutrition, making it easy to fuel up during busy days.
Preparation is as simple as tossing everything into a food processor. Whipping up a batch takes minimal time, yet the payoff is immense. Protein balls hold energy well and are fantastic for on-the-go lifestyles. The delicious taste and creamy texture make them a hit with both kids and adults alike.
Let’s dive into the world of protein balls and explore how to create these delicious snacks right in your kitchen!
Protein Balls Fundamentals
When embarking on the delightful journey of making protein balls, understanding the fundamentals can significantly enhance your experience. Protein balls offer a balance of healthy fats, protein, and natural sweetness. This combination makes them an excellent choice for a quick snack or recovery food.
Preparation/setup
Gathering the necessary equipment ensures a smooth preparation process. A food processor is key; it will mix ingredients effortlessly. Preparing your workspace helps maintain organization, allowing you to focus on creating these delicious bites.
Ingredients
To make these protein balls, you’ll need:
- 1 cup cashew (or almond) butter
- 1 1/4 cup almond flour
- 1/2 cup chocolate protein powder
- 1 1/2 tbsp coconut oil, melted
- 3 medjool dates, pitted
- 1 tbsp vanilla extract
- 3/4 tsp ground cinnamon
- 1/4 tsp almond extract
- 1/3 cup chocolate chunks
- 1 tsp finishing salt
- 2 oz cacao butter
- 4.5 oz coconut butter
- 1/4 tsp almond extract (for glaze)
- 1/2 tsp blue spirulina
Having everything ready will make mixing easier and more enjoyable.
Directions
- Mix all ingredients in a food processor until a dough forms.
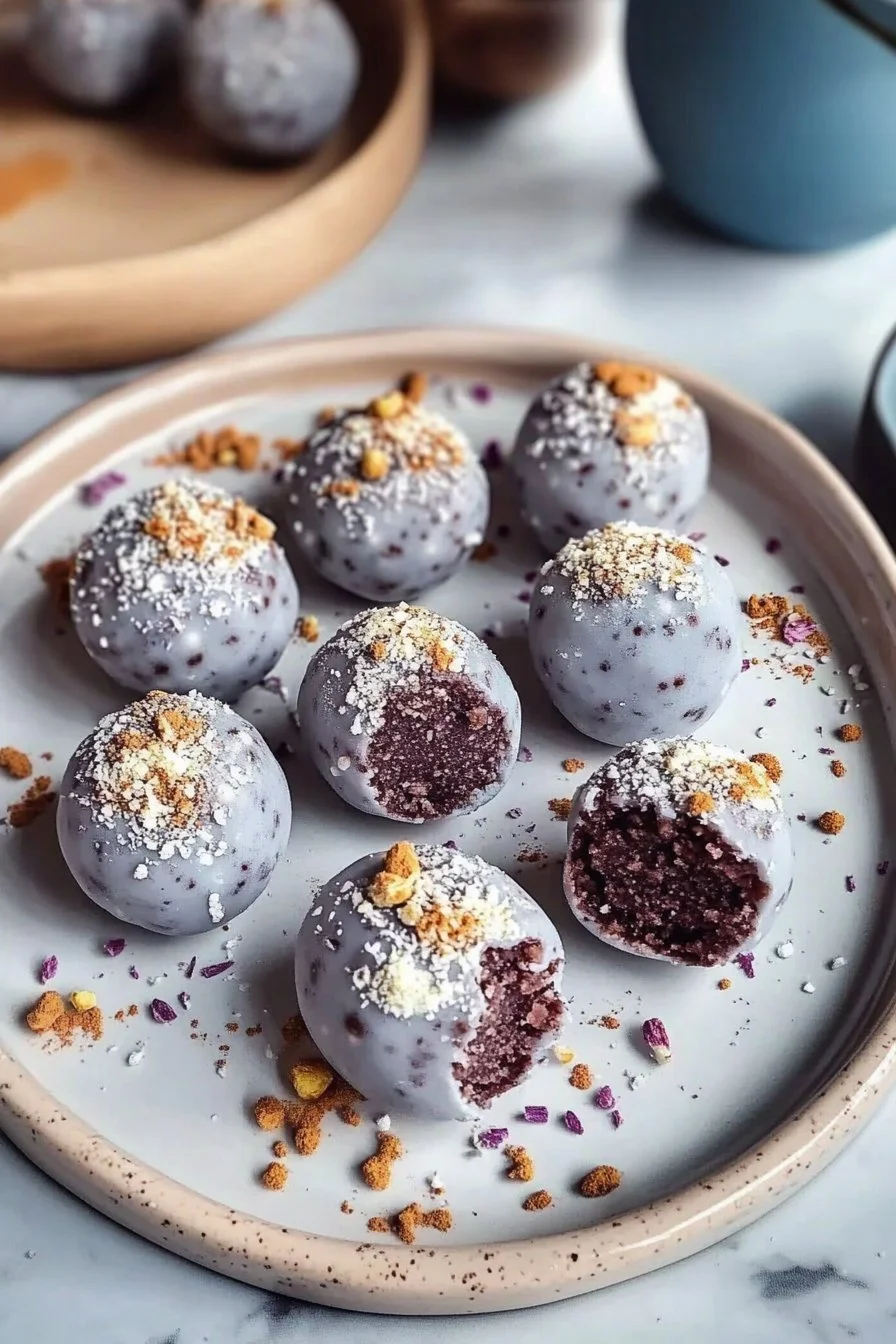
- Fold in chocolate chunks and finishing salt. Roll the mixture into 1.5-inch balls and freeze for two hours.
- For the glaze, melt cacao butter and coconut butter together, whisk in almond extract, and cool.
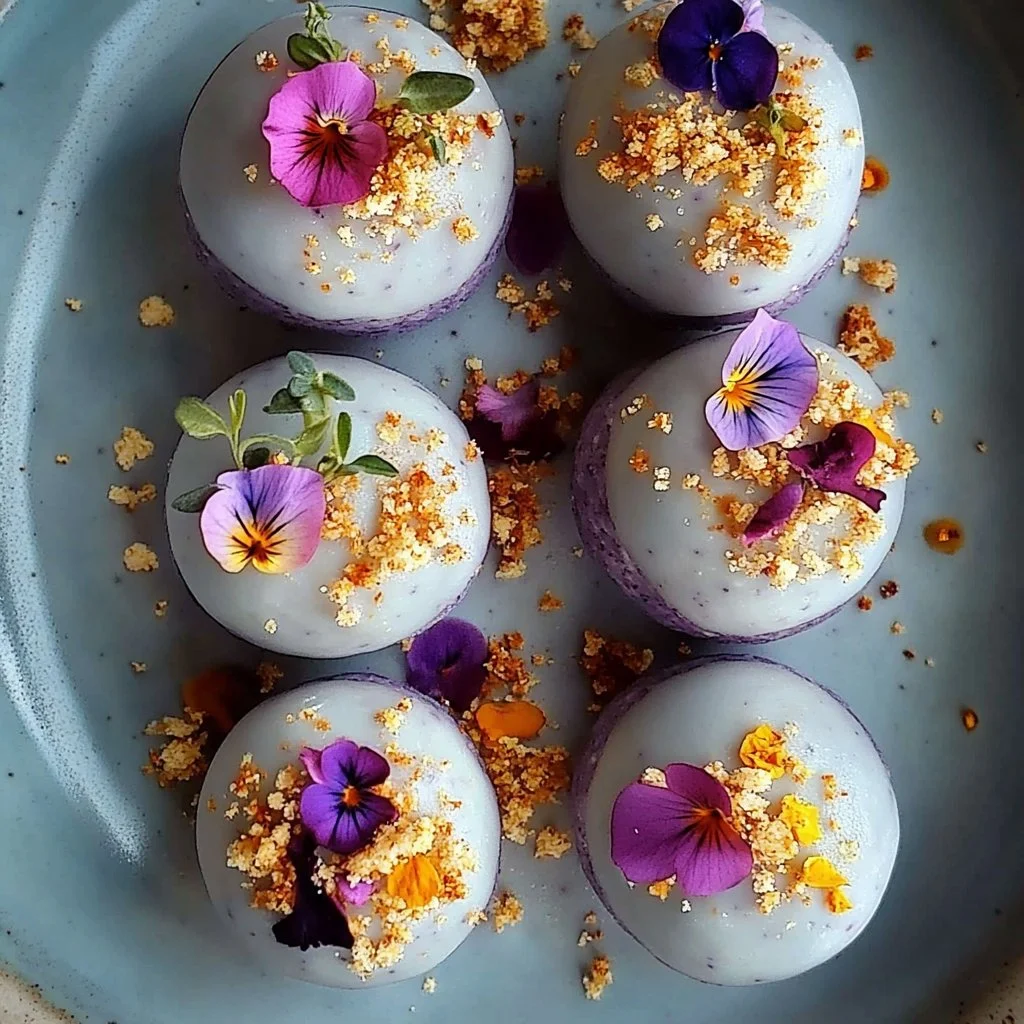
- Dip the chilled balls in the glaze and freeze for an additional 10 minutes. For a thicker coat, dip them again. Decorate as desired and store in the fridge or freezer.
Crafting Protein Balls Like a Pro
Making delicious protein balls involves specific techniques to achieve the best results. Mastering these methods can elevate your snacking game and impress your friends and family.
Technique
The key to achieving the perfect consistency lies in selecting the right ingredients. For a creamy texture, use high-quality nut butters. Ensure you measure accurately for the optimal blend of flavors. A food processor can combine everything thoroughly, so allow it to run until the mixture is smooth.
Tips/tricks
Experiment with different flavors! Swapping ingredients can lead to delightful surprises. Consider adding a touch of shredded coconut for added texture or using various nut butters for a unique taste. Have your kids help with rolling the balls; it’s a fun and engaging cooking experience.
Try incorporating spices like nutmeg or even a pinch of chili powder for a surprising kick. Don’t hesitate to play with your ingredients to create the perfect protein ball for your taste.
Perfecting Your Protein Balls
The journey of creating protein balls can take a few tries before you reach your ideal version. Perfecting your recipe allows for customization based on flavor and texture preferences.
Perfecting results
Consistency is vital. If your dough seems too dry, add a little more cashew butter or a splash of almond milk to achieve the desired texture. On the other hand, if the mixture feels too wet, adding a touch more almond flour will help balance it out.
Taste-testing the mixture before rolling allows you to find the right sweetness and flavor profile. Don’t forget; some flavors intensify as they chill.
Troubleshooting/variations
Sometimes, issues arise during preparation. If the protein balls don’t hold together well, consider blending the mixture longer to improve cohesion. If you prefer a softer texture, let them chill for a shorter time.
For those looking to change things up, swap out almond flour for oat flour or add in seeds like chia or flax for added nutrition. Creating flavor variations keeps things exciting!
Serving and Storing Protein Balls
Once you’ve prepared your protein balls, it’s essential to consider how to serve and store them to maintain their freshness and flavor.
Serving/presentation
Serving protein balls can be simple yet elegant. Present them in a colorful bowl, or stack them in jars for visual appeal. You can sprinkle a bit of finishing salt on top or drizzle chocolate for extra flair.
For a party or gathering, consider adding a variety of flavors and presenting them on a platter. This approach invites guests to sample and enjoy the array of options.
Pairings/storage
Protein balls pair perfectly with fresh fruits like apple slices or banana halves. They make excellent companions for smoothies, enhancing your nutritional intake even further.
When it comes to storage, keep them in airtight containers in the fridge for a couple of weeks or freeze them for a longer shelf life. This ensures they remain fresh and ready for snacking whenever you need a quick energy boost.
Mastering the art of making protein balls opens up a world of snack possibilities. These homemade bites deliver on flavor and nutrition, making them a favorite among health-conscious individuals. The ability to customize them, combined with simple preparation methods, ensures a delightful experience for everyone involved. Enjoy crafting your own protein balls, experimenting with flavors, and sharing your creations with others as these bites become a staple in your kitchen!
Print
Protein Balls
- Prep Time: 15 minutes
- Cook Time: 10 minutes
- Total Time: 25 minutes
- Yield: 12 servings
- Category: Snacks
- Method: No-Cook
- Cuisine: Healthy
- Diet: Vegetarian
Description
Delicious and nutritious protein balls, perfect for a quick snack or post-workout treat.
Ingredients
- 1 cup cashew (or almond) butter
- 1 1/4 cup almond flour
- 1/2 cup chocolate protein powder
- 1 1/2 tbsp coconut oil, melted
- 3 medjool dates, pitted
- 1 tbsp vanilla extract
- 3/4 tsp ground cinnamon
- 1/4 tsp almond extract
- 1/3 cup chocolate chunks
- 1 tsp finishing salt
- 2 oz cacao butter
- 4.5 oz coconut butter
- 1/4 tsp almond extract (for glaze)
- 1/2 tsp blue spirulina
Instructions
- Mix all ingredients in a food processor until a dough forms.
- Fold in chocolate chunks and finishing salt. Roll the mixture into 1.5-inch balls and freeze for two hours.
- For the glaze, melt cacao butter and coconut butter together, whisk in almond extract, and cool.
- Dip the chilled balls in the glaze and freeze for an additional 10 minutes. For a thicker coat, dip them again. Decorate as desired and store in the fridge or freezer.
Notes
Experiment with different flavors by swapping ingredients or adding spices for a unique twist.
