
📑 Table of Contents ▶
No-Fail Sourdough Bread
The first time baking sourdough felt like an adventure. Flour dust danced in the air as I mixed the water and flour, a messy yet exciting exploration of textures. It was a blend of hope and doubt—would the dough rise? Would it develop that irresistible crust? Those questions faded away when the aroma of freshly baked sourdough filled my kitchen, enveloping me like a warm hug. The first bite revealed a crispy crust and a soft, tangy interior that made the effort worthwhile.
Sourdough bread has a unique charm that connects people to the art of baking. The process transforms simple ingredients into something extraordinary. From the initial mix to the warm loaf cooling on the countertop, every step feels rewarding. It’s more than just baking bread; it’s about creating something special that can be shared with family and friends. This no-fail sourdough bread recipe encapsulates that journey, offering an easy way for anyone to experience the joy and satisfaction of homemade sourdough.
Join in on the fun! With just a few ingredients and simple techniques, you can master the craft of sourdough bread. By following these steps, you too can transform ordinary ingredients into a delicious loaf that nourishes both body and soul. Savor the flavor of your homemade creation and see how satisfying it feels to bake something so wholesome.
Understanding Sourdough Bread
Fundamentals
Sourdough bread has a rich history that dates back thousands of years. It relies on natural fermentation, which involves wild yeast and bacteria from the surrounding environment. The sourdough starter acts as the magic ingredient, capturing these wild yeasts and giving the bread its signature tangy flavor. This method offers more than just taste; it also enhances the bread’s nutritional profile, making it easier to digest.
The beauty of sourdough is that you don’t need fancy equipment or ingredients. With all-purpose flour, water, salt, and a good sourdough starter, you have everything necessary for baking a delicious loaf. Understanding these fundamentals empowers you to embrace the art of sourdough and experiment with different techniques and flavors in the future.
Preparation/setup
Gathering your ingredients can be part of the fun. Measure out 500g of all-purpose flour, 350g of water, 10g of salt, and 100g of sourdough starter. Creating a comfortable and organized workspace is essential. A clean bowl, a sturdy surface for kneading, and a warm spot for the dough to rise will set you up for success.
Once your ingredients are ready, you can start the no-fail process. The sequence of steps is crucial, from mixing the ingredients to allowing them to rise. Each phase of this recipe unfolds with anticipation. Embrace the patience that comes with waiting for your dough to rise, knowing that each minute brings you closer to that perfect loaf.
Ingredients
- 500g all-purpose flour: This will serve as the backbone of the bread, providing structure.
- 350g water: Hydration is key in developing gluten and achieving the right texture.
- 10g salt: This not only adds flavor but also strengthens the dough.
- 100g sourdough starter: The star of the show. It introduces natural leavening and unique flavor.
Directions
- In a large bowl, mix the flour and water until a shaggy dough forms.
- Let it rest for 30 minutes (this is called autolyse).
- Add the salt and starter to the dough and mix until well combined.
- Knead the dough for about 10 minutes until smooth.
- Transfer to a lightly greased bowl, cover, and let it rise for 4-6 hours at room temperature, until doubled in size.
- Shape the dough into a round loaf and place it in a floured proofing basket.
- Allow it to rise for another 1-2 hours.
- Preheat the oven to 450°F (230°C) with a Dutch oven inside.
- Carefully place the dough into the warm Dutch oven, cover, and bake for 30 minutes.
- Remove the lid and bake for an additional 15-20 minutes until golden brown.
- Cool on a wire rack before slicing.
Mastering Sourdough Techniques
Technique
Achieving the perfect sourdough loaf relies on understanding a few key techniques. When mixing the ingredients, the goal is to hydrate the flour fully. This hydration activates the enzymes that begin gluten development. The autolyse phase allows the dough to relax, making it easier to knead.
As you knead, pay attention to the dough’s texture. A well-kneaded dough should be smooth and elastic. It’s during this stage that you develop the gluten, which will give your bread strength and structure. When you let the dough rise, the warmth and time encourage fermentation, creating air bubbles and flavor.
Tips/tricks
Patience is vital in sourdough baking. Take time during each step to ensure you achieve the best results. You can also experiment with the rising times, adjusting based on your environment. Colder spaces may require more time, while warmer spots encourage faster fermentation.
Keep an eye on your dough’s appearance; it should rise until doubled in size and show a few bubbles beneath the surface. Investing in a digital thermometer can help you monitor the internal temperature of the bread as it bakes, ensuring it’s perfectly cooked through.
Perfecting Your Sourdough
Perfecting results
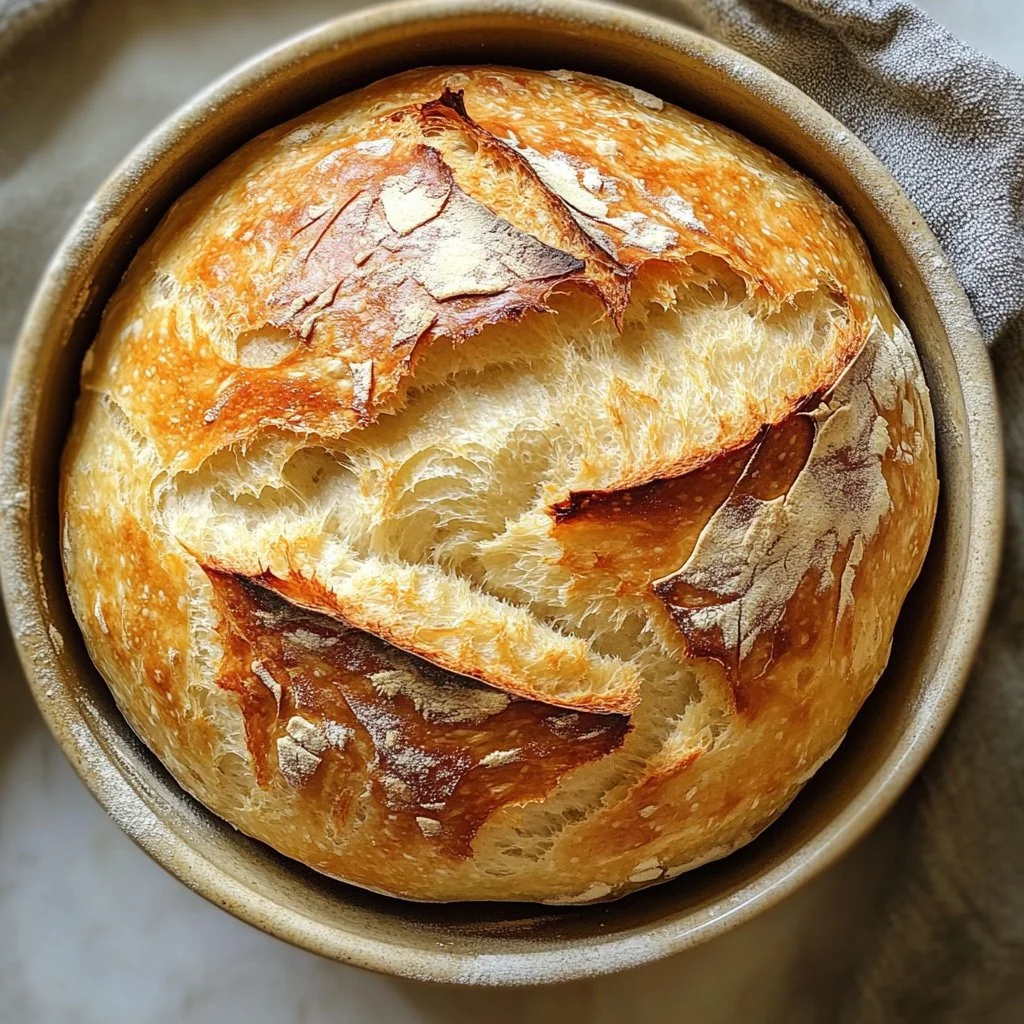
Every baker desires that perfect crust and crumb. Achieving this requires attention to detail during each phase of the process. If your crust isn’t as crispy as you want, consider adjusting baking time or temperature. An additional few minutes in the oven can make all the difference.
Also, ensure you preheat your Dutch oven thoroughly. This ensures the dough begins to cook immediately, creating that coveted steam environment essential for crust development. Experiment with placement within your home oven to find the sweet spot that produces the best results.
Troubleshooting/variations
Sourdough bread can be forgiving, but it helps to know how to troubleshoot common issues. If your dough feels too sticky, it may need a bit more flour during kneading. If the bread doesn’t rise properly, check the freshness of your sourdough starter. It should be bubbly and active.
Variations can enhance your loaf as well. Incorporating herbs, olives, or cheese during the mixing phase can elevate your sourdough experience. Don’t shy away from adjusting flavors to match your preferences or seasonal ingredients. Each variation opens up a new world of possibilities.
Serving and Storing Your Sourdough
Serving/presentation
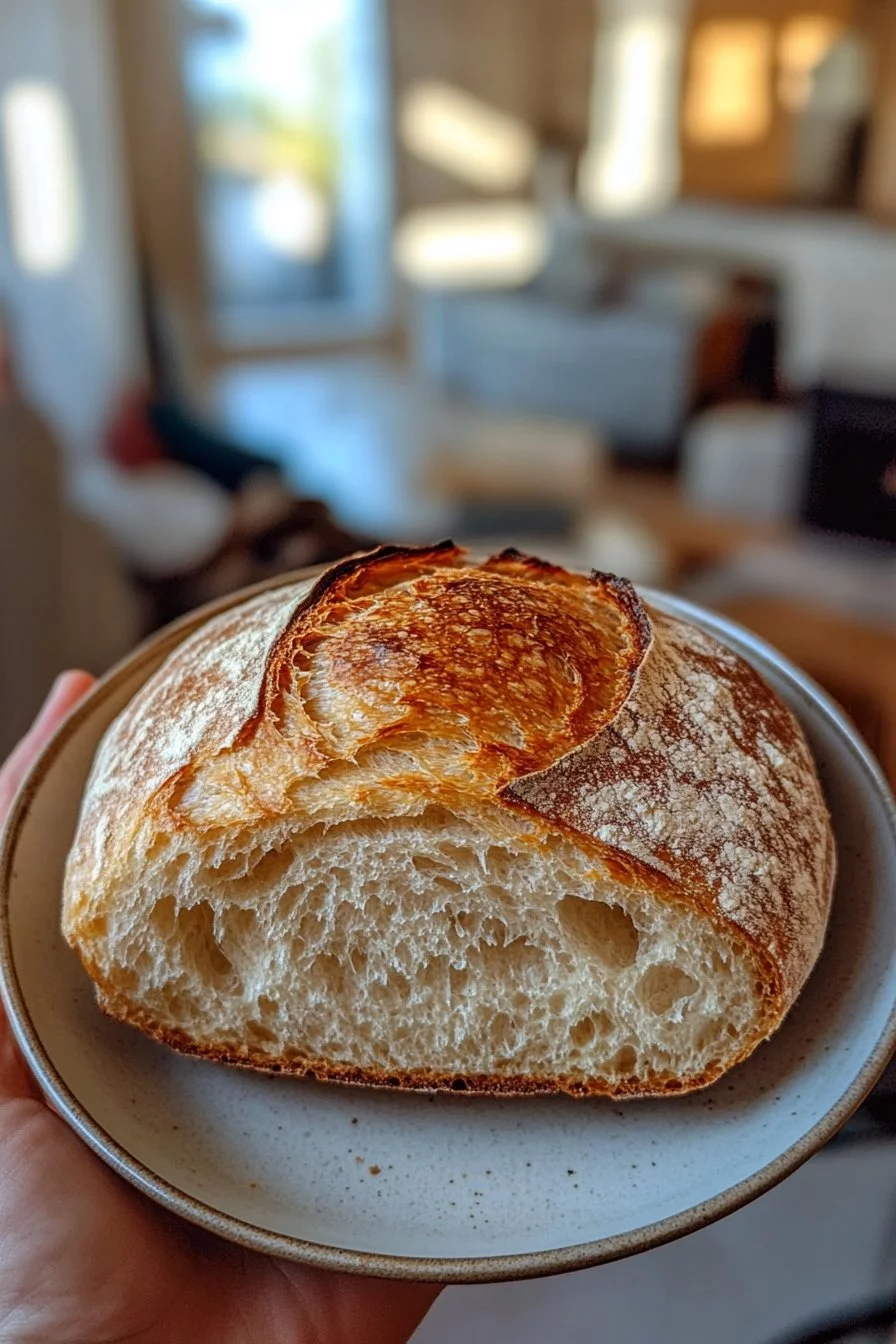
Once you bake your no-fail sourdough bread, presentation adds an appealing touch. Allow the loaf to cool completely on a wire rack, which helps maintain the crust’s integrity. When slicing, use a serrated bread knife to make clean cuts without crushing the loaf.
Consider serving your sourdough with butter or your favorite spreads to enhance its flavor. A rustic presentation on a wooden board can make it more tempting at gatherings or family meals.
Pairings/storage
The versatility of sourdough breathes life into any meal. Pair it with salads, soups, or grilled vegetables for a complete dining experience. Though never paired with wine, serving it alongside fresh veggies or savory dips makes for delightful combinations.
If you have leftovers, ensure proper storage to maintain freshness. Wrapping the loaf in a clean kitchen towel keeps it from drying out. For longer-term storage, consider freezing portions. Slice the loaf before freezing for easy access to just the right amount whenever you need it.
Sourdough baking combines simple ingredients with culinary artistry. Embracing the journey of making no-fail sourdough bread transforms the kitchen into a hub of creativity and flavor. Each step brings you closer to mastering this timeless craft, creating a baked good that satisfies both hunger and the spirit. The journey of making this delightful bread offers a connection to tradition and the joy of sharing something homemade. Sourdough is more than just bread; it’s an experience woven with love, patience, and a sprinkle of creativity.
Print
No-Fail Sourdough Bread
- Prep Time: 30 minutes
- Cook Time: 45 minutes
- Total Time: 75 minutes
- Yield: 1 loaf
- Category: Bread
- Method: Baking
- Cuisine: American
- Diet: Vegetarian
Description
An easy and reliable recipe for homemade sourdough bread with a crispy crust and a soft, tangy interior.
Ingredients
- 500g all-purpose flour
- 350g water
- 10g salt
- 100g sourdough starter
Instructions
- In a large bowl, mix the flour and water until a shaggy dough forms.
- Let it rest for 30 minutes (this is called autolyse).
- Add the salt and starter to the dough and mix until well combined.
- Knead the dough for about 10 minutes until smooth.
- Transfer to a lightly greased bowl, cover, and let it rise for 4-6 hours at room temperature, until doubled in size.
- Shape the dough into a round loaf and place it in a floured proofing basket.
- Allow it to rise for another 1-2 hours.
- Preheat the oven to 450°F (230°C) with a Dutch oven inside.
- Carefully place the dough into the warm Dutch oven, cover, and bake for 30 minutes.
- Remove the lid and bake for an additional 15-20 minutes until golden brown.
- Cool on a wire rack before slicing.
Notes
Experiment with rising times based on your environment and consider adding herbs or cheese for variations.
