

📑 Table of Contents ▶
No Bake Chocolate Peanut Butter Bars
There’s something magical about no-bake desserts. The rush of combining mouthwatering ingredients without heating up the kitchen always feels like a win, especially during hot summer days. One of my go-to no-bake treats is the delightful no bake chocolate peanut butter bar. The combination of peanut butter and chocolate creates a blissful experience that takes me back to my childhood.
The moment I pull these bars from the refrigerator, nostalgia floods in. Friends and family gather around, eager to try the creamy, rich squares I’ve made. Each bite brings a perfect balance of sweetness and salty goodness, making these no bake chocolate peanut butter bars an instant crowd-pleaser. Whenever I prepare these bars, I notice how the simple ingredients come together seamlessly, creating a rich dessert that’s satisfying yet incredibly easy to whip up.
These no bake chocolate peanut butter bars aren’t just delicious—they’re also versatile. Perfect for parties, picnics, or simply lounging at home, they stand out as an ideal dessert for any occasion. Whether you need a quick snack or something to share with loved ones, no bake chocolate peanut butter bars are the answer.
No Bake Chocolate Peanut Butter Bars
Fundamentals
No bake chocolate peanut butter bars require minimal effort and uncomplicated ingredients. The magic lies in their simplicity. Ingredients like peanut butter, butter, powdered sugar, and chocolate chips work together harmoniously to create a delicious treat that hits all the right notes.
When it comes to making a dessert that everyone loves, you can’t go wrong with a no bake recipe. These bars are soft yet sturdy enough to slice into perfect squares, making them easy to transport and serve. Plus, there’s no oven involved, which means less time spent cleaning up!
Preparation/setup
Everything begins by preparing your equipment and ingredients. Grab a 9 x 9 inch baking pan and line it with parchment paper. This will prevent your bars from sticking and make removing them from the pan a breeze. With everything set up, you create the base layer that makes these bars so irresistible.
Using an electric mixer simplifies the process. Combine your peanut butter and melted butter in a bowl until smooth. Add the powdered sugar, and mix just until combined. This dough-like mixture will become the heart of the bars once pressed into your prepared pan.
Next, refrigerate it for about 20 minutes to set. This short wait transforms your mixture into a firm base, ready to be topped with luscious melted chocolate.
Ingredients
To create no bake chocolate peanut butter bars, you’ll need:
- 1 cup peanut butter
- ½ cup butter, melted
- 2 cups powdered sugar
- 1 cup chocolate chips
- 1 tablespoon butter
These ingredients work in perfect harmony, offering a blend of creamy texture and rich flavors. Each component plays a vital role, ensuring that every bite delivers the signature taste that everyone loves.
Directions
Follow these simple steps for delectable no bake chocolate peanut butter bars:
- Line a 9 x 9 inch baking pan with parchment paper; set aside.
- In a bowl, blend the peanut butter and melted butter using an electric mixer.
- Gradually add in the powdered sugar, blending until just combined.
- Press the mixture into the prepared pan using a rubber spatula or damp hands.
- Refrigerate the base for 20 minutes until slightly firm.
- For the chocolate topping, melt the chocolate chips and 1 tablespoon of butter in a microwave-safe bowl. Use 50% power, stirring every 30 seconds until fully melted.
- Spread the melted chocolate over the cooled bars.
- Refrigerate until hardened, and then cut into small squares.

The Art of Making No Bake Chocolate Peanut Butter Bars
Technique
Creating no bake chocolate peanut butter bars is an art that can be perfected. The balance between the peanut butter and powdered sugar is crucial. Too much sugar can make the bars overly sweet, while too little can lead to a dry texture.
When mixing, aim for a smooth consistency without overmixing. Mixing just enough ensures a creamy texture that everyone can appreciate. Trust your taste buds! If the mixture feels too dense, it’s okay to add a touch more melted butter for that silky finish.
Tips/tricks
To elevate your no bake chocolate peanut butter bars, try incorporating some handy tips. For a nutty flavor, consider adding chopped nuts like almonds or walnuts on top of your chocolate layer. This addition brings a delightful crunch that contrasts beautifully with the creamy texture of the bars.
Another trick is to slightly underbake the chocolate topping. By taking it out just before it completely sets, you create a glossy finish that makes your bars look ever so inviting.
Experimenting with varying types of chocolate can also alter the flavor profile. Dark chocolate, semi-sweet, or even white chocolate can completely change the dessert’s character, offering different layers of taste that cater to personal preferences.
Perfecting No Bake Chocolate Peanut Butter Bars
Perfecting results
To achieve perfectly portioned squares, use a sharp knife to cut through the bars after they have fully set in the refrigerator. If the chocolate topping appears too firm, let them sit for a few minutes at room temperature. This warming allows for cleaner cuts and a more aesthetically pleasing presentation.
It’s also essential to make sure the base layer is sufficiently chilled before adding the chocolate topping. The contrasting temperatures can help bind the two layers, ensuring neat, clean edges when you cut the squares.
Troubleshooting/variations
If the bars appear too sticky when you’re pressing them into the pan, you might not have mixed them enough after adding the powdered sugar. Merely re-stirring the mixture can enhance its cohesiveness.
For variations, consider swirls of caramel or a dot of sea salt on top of the chocolate layer to enhance the flavor even more. Those small tweaks create unique experiences and can impress friends and family during gatherings.
Serving No Bake Chocolate Peanut Butter Bars
Serving/presentation
Presentation can greatly influence the desirability of your no bake chocolate peanut butter bars. Serve them in small squares on a bright, colorful platter. Adding some fresh berries, like strawberries or raspberries, can create an appealing contrast and add a pop of color.
If serving at a gathering, consider stacking the squares in layers, held together with toothpicks. This playful presentation style not only looks fantastic but makes it easy for guests to grab a treat while mingling.
Pairings/storage
Storing the bars properly is just as crucial as making them. Keep them in an airtight container in the refrigerator to maintain freshness. They should last for up to two weeks, although they rarely stick around that long because of their popularity!
For a fun twist, serve the no bake chocolate peanut butter bars with a scoop of vanilla ice cream or alongside fresh fruit for a refreshing contrast. Fruit complements the rich chocolate and peanut butter, balancing the sweetness beautifully.
No bake chocolate peanut butter bars are an effortless treat that can brighten any occasion. Their creamy texture, rich flavor, and no-bake simplicity make them a stellar choice for any dessert lover.
Crafting these squares of joy brings smiles to faces, connects friends, and tantalizes taste buds. With a little time in the fridge, you’ll have delicious treats that promise satisfaction one bite at a time.
Print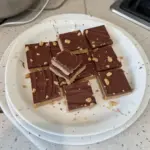
No Bake Chocolate Peanut Butter Bars
- Prep Time: 15 minutes
- Cook Time: 0 minutes
- Total Time: 35 minutes
- Yield: 16 servings
- Category: Dessert
- Method: No Bake
- Cuisine: American
- Diet: Vegetarian
Description
Delicious no-bake chocolate peanut butter bars that combine creamy peanut butter and rich chocolate for a nostalgic treat.
Ingredients
- 1 cup peanut butter
- ½ cup butter, melted
- 2 cups powdered sugar
- 1 cup chocolate chips
- 1 tablespoon butter
Instructions
- Line a 9 x 9 inch baking pan with parchment paper; set aside.
- Blend the peanut butter and melted butter using an electric mixer.
- Gradually add in the powdered sugar, blending until just combined.
- Press the mixture into the prepared pan using a rubber spatula or damp hands.
- Refrigerate the base for 20 minutes until slightly firm.
- Melt the chocolate chips and 1 tablespoon of butter in a microwave-safe bowl, stirring every 30 seconds until fully melted.
- Spread the melted chocolate over the cooled bars.
- Refrigerate until hardened, then cut into small squares.
Notes
For added crunch, consider adding chopped nuts on top. Store in an airtight container in the refrigerator for up to two weeks.
