

📑 Table of Contents ▶
- Loaded Sweet Potato Skins
- Crafting Perfect Loaded Sweet Potato Skins
- Fundamentals
- Preparation/setup
- Mastering the Art of Sweet Potato Skins
- Technique
- Tips/tricks
- Perfecting Your Sweet Potato Skins
- Perfecting results
- Troubleshooting/variations
- Serving and Storing Loaded Sweet Potato Skins
- Serving/presentation
- Pairings/storage
- Conclusion
- FAQs – Loaded Sweet Potato Skins
As I reflect on my culinary journey, I remember the first time I experimented with loaded sweet potato skins in my cozy kitchen. It was a chilly Friday evening, and I was in search of a comforting dish that would warm both body and soul. The idea of combining the natural sweetness of sweet potatoes with savory toppings sparked a culinary adventure I hadn’t anticipated.
The magic of loaded sweet potato skins lies in their ability to transform simple ingredients into something extraordinary. Each time I prepare them, I’m reminded of the joy that comes from crafting a dish that’s both delicious and satisfying. The crispy exteriors paired with creamy, cheesy insides make them an irresistible treat, perfect for gatherings or quiet nights at home.
These loaded sweet potato skins have become a staple in my home, offering a perfect balance of flavors and textures. The smile on my family’s faces as they take their first bite is a reward in itself. I love how they bring people together, sparking conversations and creating memories over shared meals. It’s a simple yet profound reminder of why I fell in love with cooking in the first place.

Loaded Sweet Potato Skins
- Prep Time: 15 minutes
- Cook Time: 1 hour 15 minutes
- Total Time: 1 hour 30 minutes
- Yield: 4 servings
- Category: Main Course
- Method: Baking
- Cuisine: American
Description
Learn how to make delicious loaded sweet potato skins with this easy recipe. Perfect for a tasty appetizer or snack. Try it today!
Ingredients
- 4 medium sweet potatoes (about 900g)
- 1 Tablespoon olive oil (15 ml)
- 1/4 cup coconut milk (60 ml)
- 1/4 teaspoon (1 ml) salt
- ground black pepper, to taste
- 1 cup (240 ml) shredded cheese (I use half sharp cheddar and half mozzarella)
- 4 strips beef bacon, cooked until crispy, and crumbled
- for serving: yogurt and chopped green onions
Instructions
- Heat your oven to 400°F (204°C). Prepare a large baking sheet by covering it with parchment paper or a silicone mat. Puncture each sweet potato a few times and roast them for 40-50 minutes until tender. Let them cool slightly before slicing each one in half lengthwise.
- Lower the oven setting to 375°F (191°C). Remove the inner sweet potato from the skin, leaving a thin layer still attached, and transfer the scooped portion to a medium bowl. Lay the skins back onto the baking sheet with the cut side facing up, drizzle with olive oil, and bake for another 10 minutes.
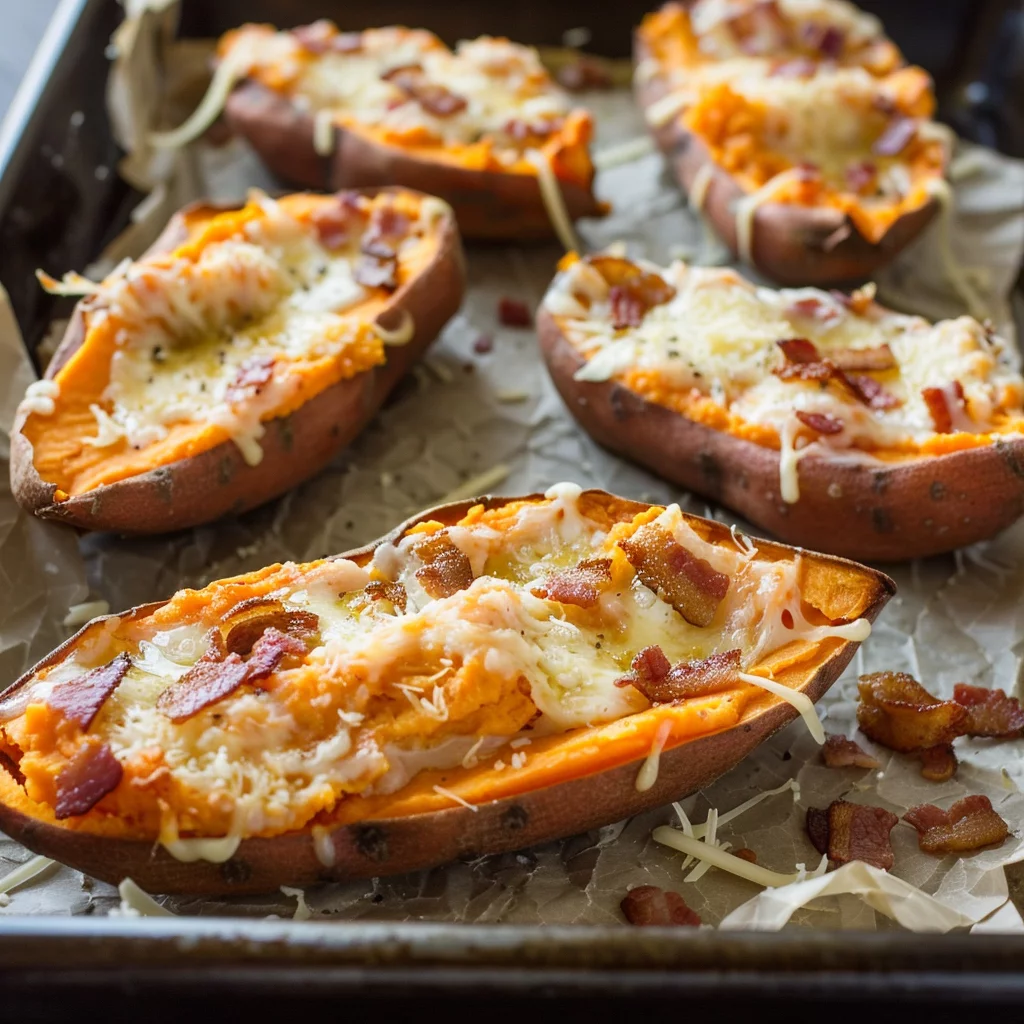
- Mix the scooped sweet potato with coconut milk, salt, and black pepper until it becomes smooth and creamy. After the skins have baked for 10 minutes, take them out of the oven. Distribute the mashed sweet potato evenly into each skin and sprinkle cheese on top. Bake for an additional 15 minutes until the cheese is bubbly and melted. Once done, take them out and sprinkle with crumbled beef bacon. Serve with yogurt and chopped green onions, if desired.
- These are best consumed right away. Seal any leftovers tightly and refrigerate them for up to 3 days.
Notes
- For a more flavorful dish, try using a blend of cheeses such as Gruyere, Parmesan, cheddar, and mozzarella.
- Bake the sweet potato skins with olive oil before adding the filling for a crispy texture.
- Customize the flavors by experimenting with toppings like diced avocado, salsa, or a drizzle of hot sauce.
Crafting Perfect Loaded Sweet Potato Skins
Fundamentals
Creating the ultimate loaded sweet potato skins starts with choosing the right sweet potatoes. Opt for medium-sized ones, as they provide the perfect balance between sweet, tender interiors and a sturdy skin that can hold all the delicious toppings. The key is to ensure they are uniform in size for even cooking.
Roasting the sweet potatoes at 400°F (204°C) allows for a perfectly tender texture. The natural sugars caramelize, enhancing their sweetness and making them an ideal canvas for savory toppings. Puncture each potato a few times before placing them in the oven to allow steam to escape.
Preparation/setup
While the sweet potatoes roast, prepare the toppings. Cook the beef bacon until it’s crispy and can be crumbled easily. The salty, smoky notes will perfectly complement the sweetness of the potatoes. Grate your cheese blend—sharp cheddar and mozzarella—to ensure it melts beautifully over the sweet potato skins.
Once the potatoes are cool enough to handle, slice them in half lengthwise and scoop out the flesh, leaving a thin layer inside the skins for extra structure. Don’t discard the scooped portion; mix it with coconut milk, salt, and black pepper to create a creamy mash that will fill the skins.
Mastering the Art of Sweet Potato Skins
Technique
The technique lies in achieving the right balance of crispy skin and creamy filling. After scooping, drizzle the skins with olive oil and return them to a 375°F (191°C) oven to crisp up. This step ensures a delightful crunch with every bite, contrasting beautifully with the creamy filling.
Once the skins are ready, fill them with the creamy sweet potato mixture and sprinkle generously with cheese. Return to the oven and bake until the cheese is bubbly and golden. This final baking step melds all the flavors together, creating a cohesive and satisfying dish.
Loaded Sweet Potato Skins
Tips/tricks
For an extra layer of flavor, consider adding a pinch of garlic powder or paprika to the sweet potato mash. These spices enhance the savory profile without overpowering the natural sweetness of the potatoes. Also, using a silicone mat or parchment paper on your baking sheet makes clean-up a breeze and prevents sticking.
Don’t rush the cooling process after roasting. Allowing the sweet potatoes to cool slightly makes them easier to handle and prevents burning your fingers while scooping out the flesh. Patience truly pays off in achieving the perfect loaded sweet potato skins.
Perfecting Your Sweet Potato Skins
Perfecting results
Perfecting loaded sweet potato skins involves attention to detail and a few trial runs. Consistency in the size of the potatoes ensures even cooking, and the right cheese blend adds depth to the flavor. The combination of sharp cheddar and mozzarella provides a rich, creamy top layer that complements the sweet potato base.
Achieving a crispy texture on the skins is crucial. Ensure the skins are well-coated with olive oil before the second bake to encourage a golden, crispy finish that enhances the overall experience. The final touch of crumbled beef bacon adds a savory crunch that perfectly balances the dish.
Troubleshooting/variations
If you encounter issues with the skins not crisping up, try increasing the baking time slightly or raising the oven temperature by a few degrees. Ensure the skins are not overcrowded on the baking sheet, allowing hot air to circulate effectively.
For those seeking variations, consider experimenting with different cheeses, such as gouda or fontina, for a unique twist. You can also explore adding different herbs or spices to the mash for an added layer of flavor. For more inspiration, check out these sweet potato chili options.
Serving and Storing Loaded Sweet Potato Skins
Serving/presentation
Presentation plays a significant role in the enjoyment of loaded sweet potato skins. Arrange them on a large platter and garnish with chopped green onions for a pop of color. Serving with a side of yogurt adds a creamy, tangy contrast that complements the rich flavors of the skins.
These loaded sweet potato skins are perfect as an appetizer, side dish, or even a main course. Their versatility allows them to fit seamlessly into any meal, from casual gatherings to festive occasions. For more creative presentations, explore our loaded baked potato rounds.

Loaded Sweet Potato Skins
Pairings/storage
When it comes to pairing, these skins are quite versatile. Serve alongside a fresh salad or roasted vegetables for a well-rounded meal. Avoid storing them for too long; they are best enjoyed fresh out of the oven.
If you have leftovers, seal them tightly and refrigerate for up to three days. Reheat in the oven to maintain their crispy texture. For more storage tips, check out this air fryer baked sweet potatoes guide.
Conclusion
Mastering loaded sweet potato skins is a rewarding culinary endeavor, offering a delightful blend of flavors and textures. With simple ingredients and thoughtful techniques, you can create a dish that’s both comforting and impressive. These sweet potato skins are an ideal choice for any occasion, bringing people together over shared meals.
Their versatility allows for endless customization, making them a favorite among home cooks. Whether you’re serving them as an appetizer or a main course, these skins are sure to delight. Embrace the joy of cooking and create memorable moments with every bite. For more inspiration, explore our cowboy BBQ bacon loaded potato bombs and curried red lentil and sweet potato stew.
