

📑 Table of Contents ▶
Japanese Cheesecake
A memorable encounter with a slice of Japanese cheesecake ignited a passion for baking. The first bite of this airy, fluffy confection brought a sense of lightness and joy that lingered long after finishing the last piece. The unique texture of Japanese cheesecake, a blend of creamy richness and delicate fluffiness, quickly captured my heart. Discovering how to make it at home became a delicious adventure.
Japanese cheesecake stands out for its versatility. Whether you enjoy it plain or adorned with fruit, the possibilities are endless. Each slice offers a balance of flavors, creating a delightful treat for all occasions. Perfect for gatherings or a simple dessert indulgence, this cake elevates any moment.
The key to mastering Japanese cheesecake lies in the right techniques and understanding the ingredients. Using just a few simple components, you can create a show-stopping dessert that impresses. Let’s dive into making this extraordinary cake, celebrating the art of baking while enjoying the magic of Japanese cheesecake.
Part 1 — Japanese Cheesecake Essentials
Fundamentals
Japanese cheesecake combines elements of both traditional cheesecakes and chiffon cakes, resulting in a dessert that’s light, airy, and incredibly satisfying. The unique texture comes from the method of folding meringue into the cream cheese-based batter. Understanding this balance is crucial to achieving the authentic Japanese cheesecake experience.
Each ingredient plays a vital role. Cream cheese provides a rich base, while eggs add structure and lift. The combination of butter and cream contributes to the cake’s moisture, creating a tender crumb. The addition of cake flour ensures a light and fluffy texture, making every bite melt in the mouth.
Preparation/setup
Preparing to bake Japanese cheesecake requires a few essential tools and the right environment. Start by gathering your equipment, including a mixing bowl, hand mixer, and a 9-inch round cake pan. A springform pan works well, allowing for easy cake removal.
Preheat your oven to 325°F (160°C). Preparing the pan properly ensures even baking. Grease the bottom and sides of the pan, then line the base with parchment paper. This little step will help the cake release easily once it’s cooled.
Ingredients
The ingredients for Japanese cheesecake are simple but must be treated with care. Here’s what you need:
- 6 large eggs (separated)
- 8 ounces cream cheese (preferably softened)
- ¼ cup heavy cream (or full fat milk)
- 4 tablespoons unsalted butter (cut into smaller pieces)
- ½ cup cake flour (fluffed, spooned, and leveled)
- 1 tablespoon lemon zest (optional)
- 1½ teaspoons vanilla extract (optional)
- ⅓ cup granulated sugar
- 2 teaspoons lemon juice (about ⅓ of a lemon)
- Powdered sugar (for dusting)
- Apricot jam (for glazing, slightly warmed)
- Berries (for serving)
- Sweetened whipped cream (for serving)
Directions
- Prepare your equipment and preheat the oven as directed. Separate the egg yolks and whites into different bowls.
- In a mixing bowl, combine the softened cream cheese, heavy cream, and butter. Mix until smooth and creamy.
- Add the egg yolks into the mixture, along with the vanilla extract, lemon zest, and lemon juice. Beat until well combined.
- Gradually add in the cake flour, mixing until smooth.
- In another bowl, whip the egg whites until frothy. Gradually add the granulated sugar, continuing to whip until stiff peaks form.
- Gently fold the meringue into the cream cheese batter, being careful not to deflate it.
- Pour the batter into the prepared cake pan and smooth the top.
- Bake in the preheated oven for about 30-35 minutes or until the top is lightly golden and a toothpick inserted in the center comes out clean.
- Remove from the oven and let the cheesecake cool in the pan for 10 minutes. Carefully remove the cake from the pan and cool completely on a wire rack.
- Dust with powdered sugar, glaze with apricot jam, and serve with fresh berries and sweetened whipped cream.
Part 2 — Mastering the Technique
Technique
Baking a Japanese cheesecake comes down to mastering your folding technique. The delicate balance between the meringue and cream cheese batter is essential for achieving that signature fluffy texture. Folding requires a gentle touch; using a rubber spatula, carefully lift the batter and fold it over the meringue, creating an airy mixture.
Start by adding one-third of the meringue into the cream cheese mixture. This will lighten the batter, making it easier to incorporate the rest of the meringue without losing volume. Take your time during this process, and avoid stirring vigorously, which can deflate the meringue.
Tips/tricks
When tackling Japanese cheesecake, consider the following tips for best results:
- Allow your cream cheese and butter to soften at room temperature for easier mixing.
- Whip the egg whites in a grease-free bowl, as any fat can prevent them from reaching stiff peaks.
- Use a digital kitchen scale to ensure precise measurements, especially for the cake flour.
- If you want to enhance the flavor, feel free to introduce other extracts or citrus zests that complement the dish.
- Experiment with variations like adding fruit purees or adapting the glaze to suit your taste.
Part 3 — Perfecting the Results
Perfecting results
Achieving the perfect Japanese cheesecake requires careful attention during baking. The oven temperature plays a critical role; make sure it remains stable throughout the baking process. An oven thermometer can help ensure accuracy.
Monitor the cheesecake closely as it bakes. A slight jiggle in the center is acceptable; it will set as it cools. Once baked, turn off the oven, crack the door open, and let the cake cool gradually. This slow cooling prevents the cheesecake from sinking or cracking.
Troubleshooting/variations
Even the best bakers encounter challenges. If your cheesecake remains too dense or fails to rise, check the mixing technique used for the meringue. Ensure you achieve stiff peaks before folding. If the cheesecake cracks, overlapping the cooling method helps prevent sudden changes in temperature.
Variations are a fun way to personalize your cheesecake. Consider incorporating matcha powder for a unique flavor twist or adding a layer of fruit at the bottom of the pan. Getting creative can lead to delightful surprises.
Part 4 — Serving and Storage
Serving/presentation
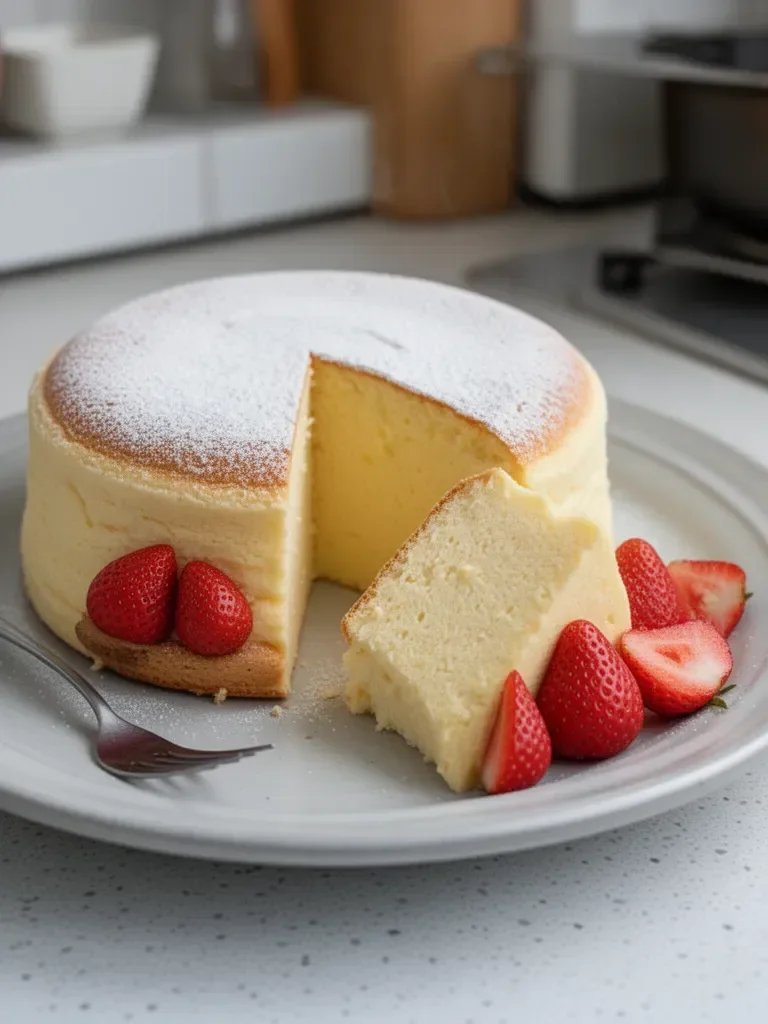
Serving Japanese cheesecake comes down to simple, elegant presentation. After dusting with powdered sugar, consider a drizzle of apricot jam to add shine. Position fresh berries around the cake for a pop of color and flavor. Sweetened whipped cream adds a delightful finishing touch, making each slice visually appealing.
Pair the cheesecake with complementary flavors, such as citrus-based sauces or purees. A clean, sharp knife ensures you make perfect cuts, revealing the beautiful, fluffy texture.
Pairings/storage
While the Japanese cheesecake shines on its own, serving it with fresh berries enhances the experience. Whipped cream offers a luscious contrast, adding creaminess to every bite. Consider serving alongside a cup of coffee or tea to balance the sweetness.
To store your cheesecake, keep it in an airtight container in the refrigerator. Enjoy it within three days for the best quality. If you want to make it ahead of time, the flavor and texture remain fantastic when chilled.
This Japanese cheesecake balances tradition and modern culinary artistry, making it a delightful dessert for any occasion. The combination of flavors and textures delights the senses, ensuring each bite brings joy and satisfaction.
Print
Japanese Cheesecake
- Prep Time: 15 minutes
- Cook Time: 35 minutes
- Total Time: 50 minutes
- Yield: 8 servings
- Category: Dessert
- Method: Baking
- Cuisine: Japanese
- Diet: Vegetarian
Description
A light and airy dessert that combines creamy richness with delicate fluffiness, perfect for any occasion.
Ingredients
- 6 large eggs (separated)
- 8 ounces cream cheese (preferably softened)
- ¼ cup heavy cream (or full fat milk)
- 4 tablespoons unsalted butter (cut into smaller pieces)
- ½ cup cake flour (fluffed, spooned, and leveled)
- 1 tablespoon lemon zest (optional)
- 1½ teaspoons vanilla extract (optional)
- ⅓ cup granulated sugar
- 2 teaspoons lemon juice (about ⅓ of a lemon)
- Powdered sugar (for dusting)
- Apricot jam (for glazing, slightly warmed)
- Berries (for serving)
- Sweetened whipped cream (for serving)
Instructions
- Prepare your equipment and preheat the oven to 325°F (160°C).
- Separate the egg yolks and whites into different bowls.
- Combine the softened cream cheese, heavy cream, and butter in a mixing bowl. Mix until smooth and creamy.
- Add the egg yolks, vanilla extract, lemon zest, and lemon juice into the mixture. Beat until well combined.
- Gradually add the cake flour, mixing until smooth.
- Whip the egg whites in another bowl until frothy. Gradually add the granulated sugar, continuing to whip until stiff peaks form.
- Fold the meringue into the cream cheese batter gently, being careful not to deflate it.
- Pour the batter into the prepared cake pan and smooth the top.
- Bake in the preheated oven for about 30-35 minutes or until the top is lightly golden and a toothpick inserted in the center comes out clean.
- Remove from the oven and let the cheesecake cool in the pan for 10 minutes. Carefully remove the cake from the pan and cool completely on a wire rack.
- Dust with powdered sugar, glaze with apricot jam, and serve with fresh berries and sweetened whipped cream.
Notes
For best results, allow your cream cheese and butter to soften at room temperature. Whip egg whites in a grease-free bowl for better volume.
