

📑 Table of Contents ▶
Garlic Bread Rolls
A long-standing tradition in my family is to serve homemade garlic bread rolls during our Sunday dinners. Everyone eagerly anticipates that warm, buttery goodness that fills the kitchen with a delightful aroma. The moment I pull them out of the oven, everyone gathers around, hungry for a taste. Each roll, soft with a golden-brown top, beckons with promises of flavor and comfort.
These garlic bread rolls are not just a side dish; they embody the spirit of family, laughter, and shared moments at the dinner table. I still remember my grandmother’s secret technique of brushing warm, garlic-infused butter over the freshly baked rolls. That simple act made each bite a culinary experience.
Exploring new variations of garlic rolls brings me joy, especially when I refine my technique to achieve that perfect fluffiness. With just a handful of basic ingredients, you can transform an ordinary meal into an extraordinary one.
Follow along as we dive deeper into creating garlic bread rolls that will impress your family and friends, making every gathering a bit more special.
Garlic Bread Rolls: The Fundamentals
Garlic bread rolls rely on a few essential ingredients that come together to create something truly delightful. The base consists of all-purpose flour, instant yeast, and fat—namely butter. The balance of milk and egg enriches the dough, making it tender and fluffy. Garlic provides that iconic flavor, and fresh parsley adds a pop of freshness.
Starting with the dough, you’ll find that proper measurements are crucial. Each ingredient plays a vital role in the texture and taste of the finished product. You’ll mix flour, sugar, yeast, and salt in a stand mixer before adding warmed milk, an egg, and melted garlic butter.
Preparation truly sets the stage for success. Buttering your baking pan generously prevents sticking and ensures an even bake. Letting the rolls rise until they double in size is essential for achieving that light, airy texture we all adore. As you wait, the enticing smell of yeast working its magic fills your kitchen, making the anticipation all the sweeter.
Mastering Garlic Bread Rolls
Perfecting the technique for garlic bread rolls comes down to kneading and shaping. Use a dough hook for kneading to ensure it’s smooth and soft—a sign that gluten has developed properly. If you find the dough too sticky, resist the urge to add excessive flour. Instead, gradually add just a tablespoon at a time until you achieve the right consistency.
After kneading, divide the dough into equal portions. Using a scale for accuracy guarantees consistent roll sizes. Shaping them into smooth balls involves pinching the bottom seam, ensuring each roll holds its shape and bakes evenly. This attention to detail makes a noticeable difference in your final product.
Once shaped, the rolls need time to rise in a warm environment. The perfect rising time can vary based on your kitchen’s temperature, so keep an eye on them. Watching the dough balloon in size is a satisfying reward for your efforts.
Perfecting Garlic Bread Rolls
Achieving the perfect garlic bread rolls often involves a bit of fine-tuning. The color of the rolls when they come out of the oven is a good indicator of doneness. Aim for a rich, golden brown that tells you the inside is cooked through without being dry.
Using a thermometer to check the internal temperature can help you avoid under or overbaking. A well-baked roll should register around 190°F. If they seem too pale, consider increasing your oven temperature slightly for the last few minutes of baking.
In case your rolls rise too quickly and begin to flatten, this might mean too much yeast or insufficient kneading. Make adjustments next time by reducing the yeast or kneading longer. Alternatively, if your rolls are too dense, ensure your measurements are accurate.
Serving and Presentation
After brushing the rolls with that irresistible garlic butter and sprinkling flaky sea salt, presentation becomes the final touch. Arrange the rolls in a basket lined with a clean cloth to keep them warm. This rustic touch adds charm to any dining table.
Everyone loves to tear into fresh rolls, and the aroma of garlic will surely captivate your guests. Pair them with a homemade soup or salad, allowing the fluffy texture to complement hearty dishes.
Storing leftover rolls is straightforward. Keep them in an airtight container at room temperature for a couple of days or freeze for up to three months. Reheating in the oven brings that fresh-out-of-the-oven warmth back, preserving the delicious flavors you’ve created.
Garlic bread rolls can also find their way into other meals. Crumble them into a salad for added texture, or serve them as a side for brunch with eggs. The versatility of these rounds makes them a constant favorite in any home.
Homemade garlic bread rolls not only elevate your meals but also foster a sense of warmth and comfort that makes every bite special. Enjoy the process of creating and sharing these delightful rolls with family and friends as they gather around your table.
Print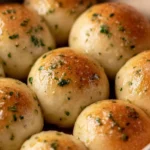
Garlic Bread Rolls
- Prep Time: 15 minutes
- Cook Time: 25 minutes
- Total Time: 40 minutes
- Yield: 12 servings
- Category: Side Dish
- Method: Baking
- Cuisine: American
- Diet: Vegetarian
Description
Delicious homemade garlic bread rolls that are soft, buttery, and perfect for any gathering.
Ingredients
- 4 cups all-purpose flour
- 2 tbsp sugar
- 2 1/4 tsp instant yeast
- 1 tsp salt
- 1 cup milk, warmed
- 1 large egg
- 1/2 cup butter, melted
- 4 cloves garlic, minced
- 2 tbsp fresh parsley, chopped
- Flaky sea salt for topping
Instructions
- In a stand mixer, combine flour, sugar, yeast, and salt.
- Add warmed milk, egg, and melted garlic butter, and mix until a dough forms.
- Knead the dough with a dough hook until smooth and elastic.
- Place the dough in a buttered bowl, cover, and let it rise until doubled in size.
- Preheat your oven to 375°F (190°C).
- Divide the dough into equal portions and shape into smooth balls.
- Place the rolls on a buttered baking pan, cover, and let rise again for 30 minutes.
- Bake in the preheated oven for 20-25 minutes until golden brown.
- Brush the rolls with garlic butter and sprinkle with flaky sea salt before serving.
Notes
For best results, let the rolls rise slowly in a warm environment. Store leftovers in an airtight container or freeze for later enjoyment.
