
📑 Table of Contents ▶
Burnt Honey Pie
The aroma of caramelized honey fills the kitchen, inviting memories of family gatherings where delicious desserts take center stage. Burnt honey pie has become a staple at our celebrations, embodying sweetness and warmth. Every time I prepare this pie, I recall the moments spent with loved ones, sharing laughter and stories while indulging in its rich flavor.
This dessert blends simplicity and elegance, making it easily accessible yet impressive enough for special occasions. The balance of flavors—sweet honey, creamy texture, and the hint of vanilla—creates a delightful experience. Burnt honey pie is more than just a recipe; it’s a tradition that connects us and adds a sprinkle of joy to our lives.
As the golden crust bakes until perfect and the filling bubbles with anticipation, I feel a sense of excitement. The beauty of burnt honey pie lies in its charm; it invites everyone to partake in a slice of happiness. Join me in exploring how to create this irresistible pie that has captured our hearts.
Burnt Honey Pie Fundamentals
Fundamentals
To create a perfect burnt honey pie, you need to understand its components, techniques, and the importance of each ingredient. At its core, burnt honey pie combines a flaky crust with a creamy filling that boasts a unique caramelized flavor. The harmonious blend of honey, cream, and eggs results in a silky texture that melts in your mouth.
The fundamental aspect of this dessert is the honey. The caramelization invigorates its natural flavors, adding depth and warmth. Using high-quality honey makes a noticeable difference and elevates the pie to new heights. Heavy cream contributes to the richness, while eggs ensure a stable and smooth filling.
Preparation/Setup
Preparation involves a few crucial steps that will pave the way for your success with burnt honey pie. Start by preheating the oven to 350°F (175°C). This step is essential, as it ensures even cooking and browning for the crust.
Next, focus on the pie crust. Whether you opt for a store-bought variety or make your own, ensure it is baked in advance to save time and increase the pie’s stability. A pre-baked crust helps achieve a perfect texture, which complements the creamy filling seamlessly.
Ingredients
To make burnt honey pie, gather the following ingredients:
- 1 pie crust
- 1 cup honey
- 1 cup heavy cream
- 3 large eggs
- 1/4 teaspoon sea salt
- 1 teaspoon vanilla extract
- Toasted nuts (optional, for topping)
Make sure to have everything on hand before you begin; having your ingredients organized streamlines the cooking process.
Directions
- Preheat your oven to 350°F (175°C).
- In a saucepan over medium heat, gently cook honey until it starts to darken and caramelize, stirring frequently to prevent burning.
- In a separate bowl, whisk together the eggs, sea salt, and vanilla extract.
- Once the honey is caramelized, slowly whisk in the heavy cream until well blended.
- Gradually combine the honey mixture with the egg mixture, whisking continuously.
- Pour the mixture into the pre-baked pie crust.
- Bake for 25-30 minutes or until set.
- Allow the pie to cool before serving. Top with toasted nuts if desired.
Baking Techniques for Burnt Honey Pie
Technique
The technique of making burnt honey pie focuses on caramelizing the honey to perfection. Use medium heat to control the caramelization process. Allow the honey to simmer slowly, stirring regularly. Watch closely as it transitions from light amber to a deeper hue; this stage brings out complex, toasty flavors.
Whisking continuously after incorporating the heavy cream is crucial. This action ensures a smooth and well-blended filling without lumps. It also aids in incorporating air into the mixture, contributing to the pie’s final texture.
Tips and Tricks
To ensure your burnt honey pie is a success, keep a few tips in mind. First, using a high-quality pie crust will enhance the overall texture of the dessert. If you decide to make your own crust, allow it to chill in the refrigerator before rolling it out. This step helps with flakiness and structure.
Don’t rush the caramelization of the honey. A patient approach will result in richer flavors, enhancing the final product. If you prefer a nuttier flavor, consider toasting your nuts prior to adding them as a topping. This simple step adds an extra layer of complexity.
Perfecting Your Burnt Honey Pie
Perfecting Results
Perfecting burnt honey pie requires practice, but these guidelines will help you achieve the best results. Ensure your ingredients are fresh and measured accurately to maintain consistency in flavor and texture. If you want a more complex profile, experiment with different types of honey. Each variety will lend a unique note to the pie.
Observe the baking time closely. The pie should be set in the center but slightly wobbly when it comes out. It will continue to firm up as it cools, creating a tender and creamy texture.
Troubleshooting and Variations
If your pie does not set properly, it may require a longer baking time. Oven temperatures can vary, so keep checking for doneness. A slight jiggle in the middle is normal, but the edges should appear firm.
For those seeking variations, try incorporating different flavors. A hint of citrus zest or a splash of your favorite extract can enhance the honey’s flavor profile. You might also fold in some finely chopped herbs for a surprising twist.
Serving and Storing Burnt Honey Pie
Serving and Presentation
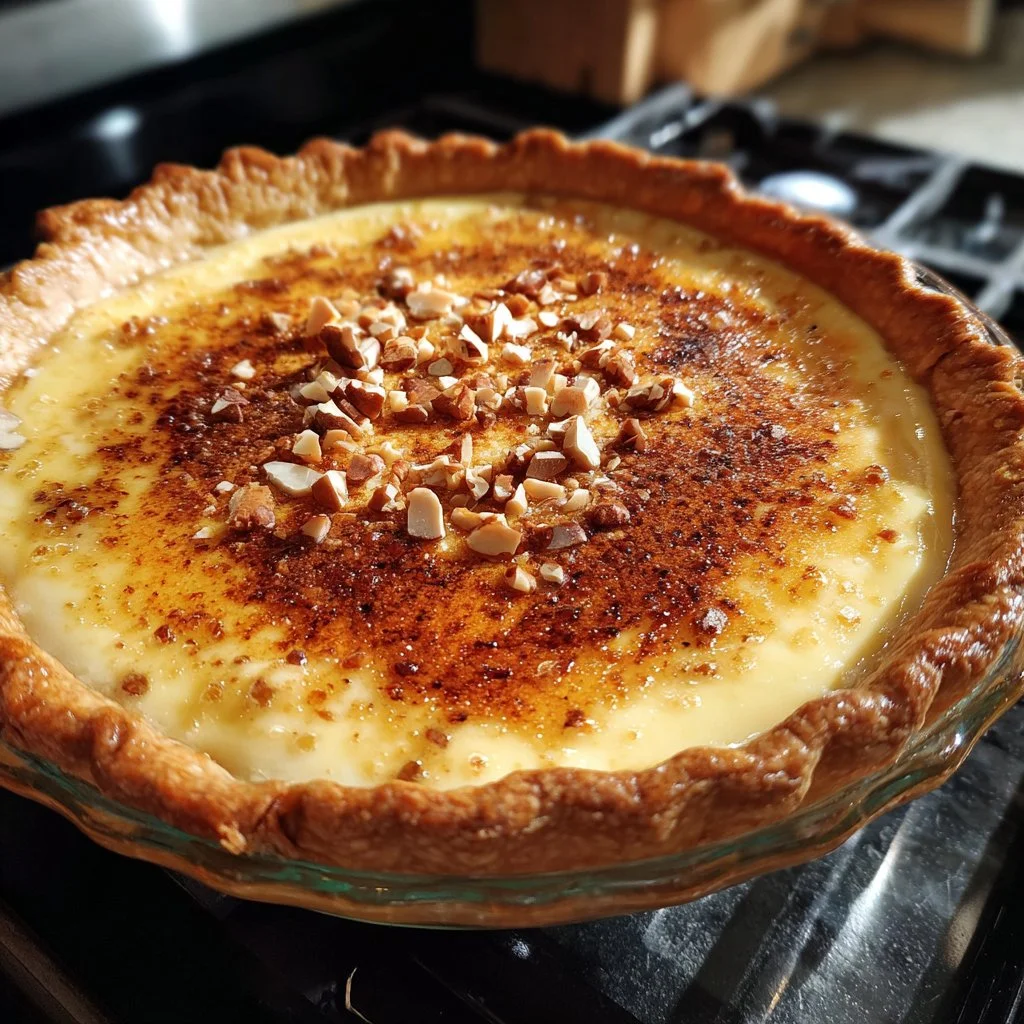
The presentation of your burnt honey pie can elevate its overall appeal. Serve it chilled or at room temperature with a light dusting of powdered sugar for an elegant touch. The contrast of the creamy filling and crisp crust creates a beautiful visual.
Toasting nuts can further enhance the presentation and flavor. Scatter them on top just before serving for a delightful crunch that harmonizes with the smooth filling.
Pairings and Storage
Pair burnt honey pie with a variety of desserts or light accompaniments. Fresh fruits, like berries or poached pears, create a delightful contrast. For storage, keep the pie covered in the refrigerator for up to five days. The cool environment helps maintain its texture and flavor.
Consider freezing portions of the pie as well. This step makes it convenient for enjoying this delightful dessert later on. When thawing, let it sit at room temperature, allowing the flavors to bloom once again.
In conclusion, burnt honey pie is a delectable dessert that combines simplicity with sophistication. Its rich flavors and creamy filling create a memorable experience that is sure to impress. Each step, from caramelizing the honey to baking the pie, contributes to a delightful creation that warms the heart and pleases the palate.
Print
Burnt Honey Pie
- Prep Time: 15 minutes
- Cook Time: 30 minutes
- Total Time: 45 minutes
- Yield: 8 servings
- Category: Dessert
- Method: Baking
- Cuisine: American
- Diet: Vegetarian
Description
A delightful dessert featuring a creamy filling of caramelized honey and heavy cream, encased in a flaky crust, perfect for special occasions.
Ingredients
- 1 pie crust
- 1 cup honey
- 1 cup heavy cream
- 3 large eggs
- 1/4 teaspoon sea salt
- 1 teaspoon vanilla extract
- Toasted nuts (optional, for topping)
Instructions
- Preheat your oven to 350°F (175°C).
- In a saucepan over medium heat, gently cook honey until it starts to darken and caramelize, stirring frequently to prevent burning.
- In a separate bowl, whisk together the eggs, sea salt, and vanilla extract.
- Once the honey is caramelized, slowly whisk in the heavy cream until well blended.
- Gradually combine the honey mixture with the egg mixture, whisking continuously.
- Pour the mixture into the pre-baked pie crust.
- Bake for 25-30 minutes or until set.
- Allow the pie to cool before serving. Top with toasted nuts if desired.
Notes
For a more complex flavor, experiment with different types of honey and consider adding a hint of citrus zest or herbs.
