
📑 Table of Contents ▶
- The joy of these hand pies lies in their homemade filling and crispy outer crust. Experience the wonderful flavor and comfort they bring to gatherings or simple nights at home.
- Perfect Cherry Hand Pies
- Fundamentals
- Preparation/setup
- Directions
- Mastering the Technique of Cherry Hand Pies
- Technique
- Tips and Tricks
- Perfecting Results
- Perfecting Results
- Troubleshooting/variations
- Serving and Storing Cherry Hand Pies
- Serving/presentation
- Pairings/storage
Cherry Hand Pies
The aroma of fresh cherries always takes me back to summer days spent at my grandmother’s house. She would let me pick cherries from her backyard, and we’d spend hours pitting them together. Those moments sparked my love for baking, especially for cherry treats like cherry hand pies. The process of transforming those bright, juicy fruit clusters into a delightful filling remains etched in my memory.
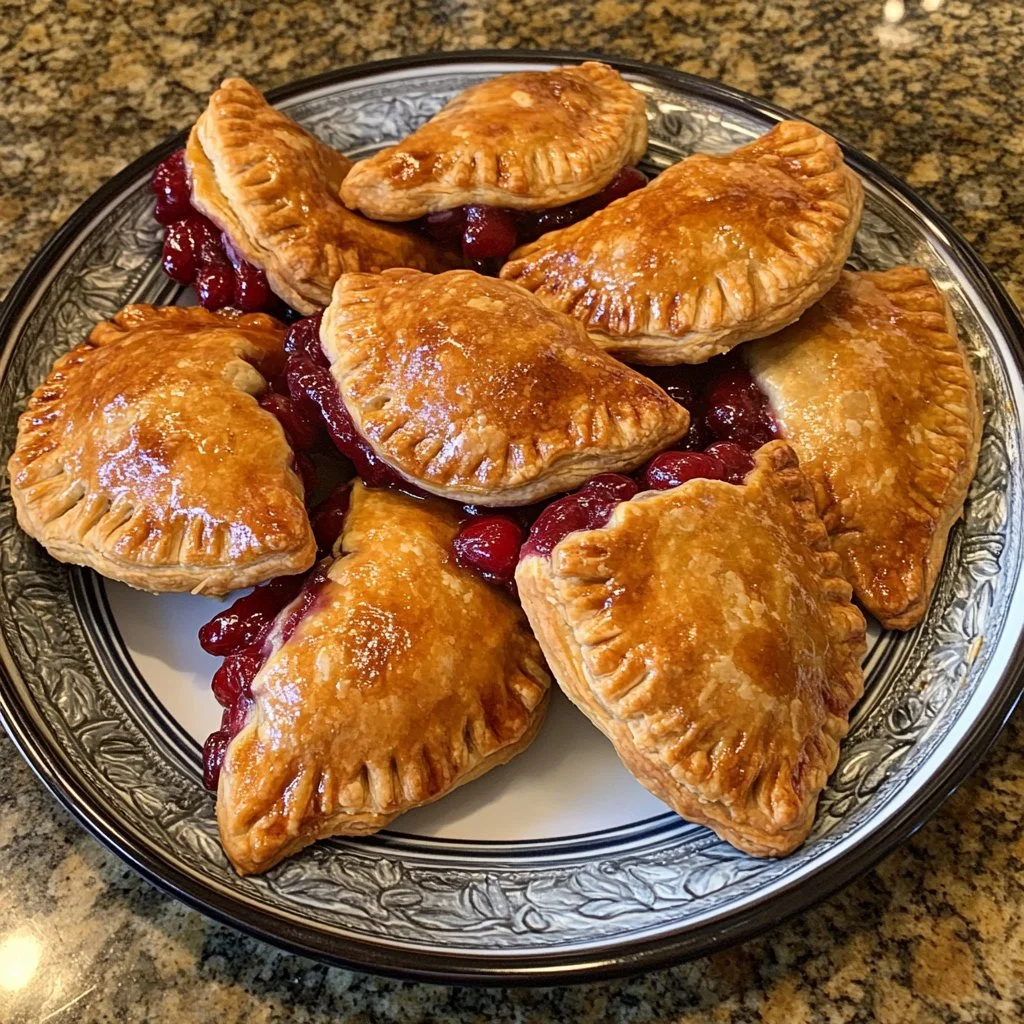
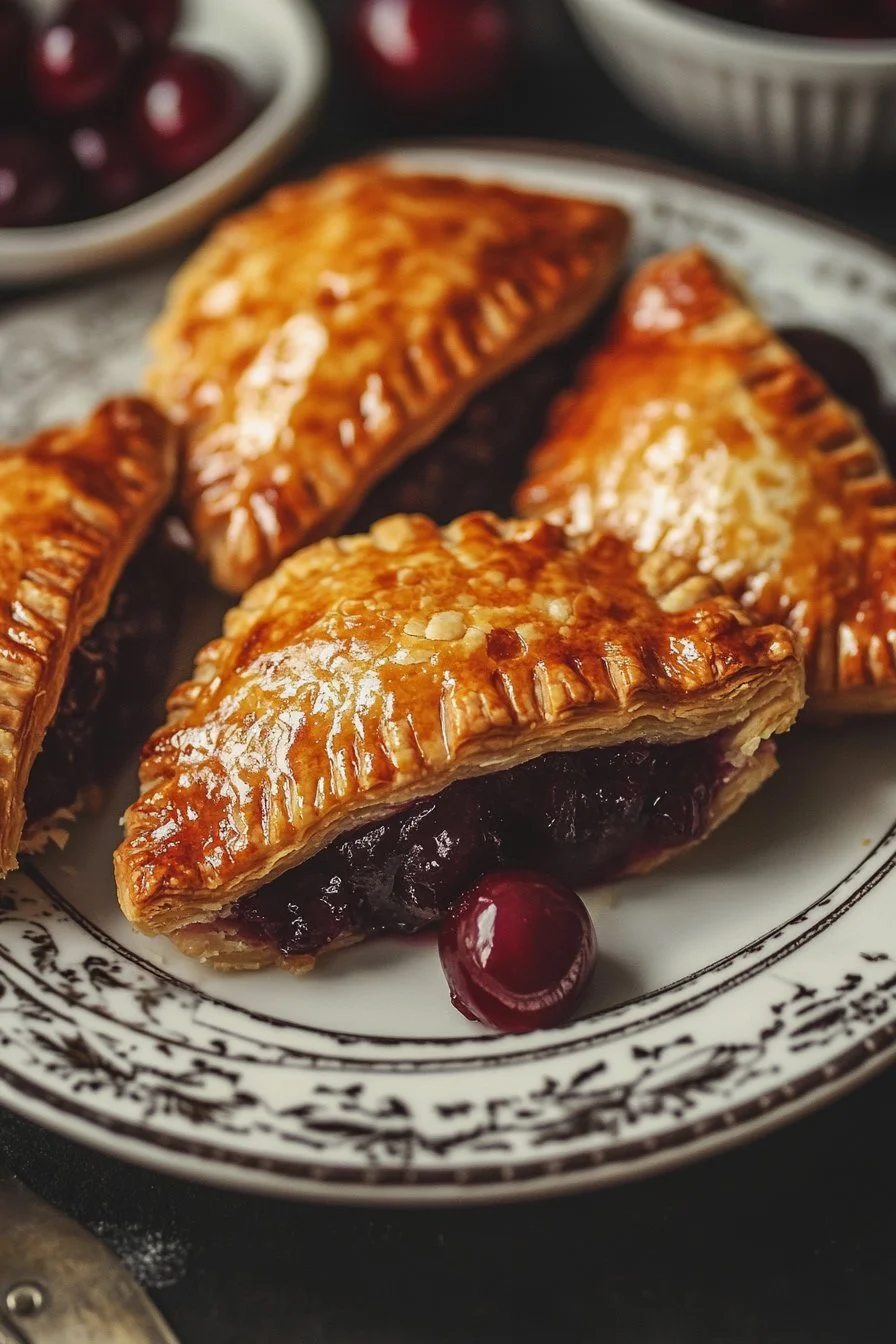
Cherry hand pies embody comfort and nostalgia, bringing childhood memories alive with every bite. The rich, tangy cherry filling perfectly nestled within a flaky crust creates a satisfying experience. I can vividly recall the excitement as we pulled the pies from the oven— golden brown and with a sweet glaze dripping on top.
Preparing cherry hand pies doesn’t have to be daunting. With a few simple ingredients, you can recreate this beloved treat at home. Follow along as we dive into the delightful world of cherry hand pies, from preparation to frying, and watch your kitchen come alive with sweet aromas.
The joy of these hand pies lies in their homemade filling and crispy outer crust. Experience the wonderful flavor and comfort they bring to gatherings or simple nights at home.
Perfect Cherry Hand Pies
Fundamentals
Cherry hand pies offer a wonderful combination of flavors and textures. This recipe captures the essence of cherries while providing a delightful crunch from the pie crust. The rich sweetness and slight tang of pitted cherries make them the star of the show.
You need to understand a few key elements in creating the perfect cherry hand pie. First, selection of fresh, ripe cherries will significantly enhance the flavor profile. Treat yourself to the juiciest cherries you can find; they will shine through in the filling. Balance the sweetness with sugar while cornstarch helps thicken the filling, creating the ideal consistency.
Preparation/setup
Preparation begins with gathering your ingredients. Ensure you have 2 cups of pitted cherries, 1 cup of sugar, 2 tablespoons of cornstarch, and a few additional essentials. Cookies or desserts often call for vanilla extract, and this recipe uses 1 teaspoon to provide depth to the cherry flavor. Adding 1 tablespoon of lemon juice brightens the taste and complements the natural sweetness of the cherries.
Start by combining the cherries, sugar, cornstarch, vanilla extract, and lemon juice in a saucepan. Cook over medium heat until thickened, creating that luscious filling that your taste buds will crave. After you’ve cooked the mixture, it is crucial to allow it to cool completely. This will help prevent the crust from becoming soggy during frying.
Ingredients
Here’s what you need to make fabulous cherry hand pies:
- 2 cups of pitted cherries
- 1 cup of sugar
- 2 tablespoons of cornstarch
- 1 teaspoon of vanilla extract
- 1 tablespoon of lemon juice
- 1 package of pie crusts
- Oil for frying
- 1 cup of powdered sugar
- 2 tablespoons of almond milk
- 1/2 teaspoon of almond extract
Directions
- In a saucepan, combine cherries, sugar, cornstarch, vanilla extract, and lemon juice. Cook over medium heat until thickened. Allow to cool.
- Roll out the pie crust and cut into circles.
- Place a spoonful of cherry filling on one half of the circle, fold, and seal the edges.
- Heat oil in a deep fryer or pot to 350°F (175°C).
- Fry the hand pies until golden brown, about 3-4 minutes per side.
- Remove from oil and drain on paper towels.
- In a bowl, whisk together powdered sugar, almond milk, and almond extract to make the glaze.
- Drizzle the glaze over the warm hand pies and serve.
Mastering the Technique of Cherry Hand Pies
Technique
Creating cherry hand pies involves a few techniques that elevate the overall quality. When rolling out the pie crust, ensure an even thickness to promote uniform cooking. This prevents some pies from cooking too quickly while others remain undercooked.
Sealing the edges of the hand pies is crucial in preventing the filling from leaking during frying. A simple pinch or use of a fork creates a tight seal that keeps the delicious cherry filling intact.
Frying these hand pies allows the crust to develop a delightful crunch. Always monitor the oil temperature closely. Too hot, and the crust may burn; too cool, and the pies absorb excess oil, becoming greasy.
Tips and Tricks
Some simple tips can elevate your cherry hand pies. Using almond extract in the glaze adds a unique twist, enhancing the flavor palette. When mixing the powdered sugar with almond milk, adjust for consistency; a thicker glaze stays beautifully on top.
Make sure to let the filled pies rest before frying. This short resting period allows the filling to settle and the dough to relax, leading to better frying results. For convenience, consider making the cherry filling ahead of time; it stores well in the refrigerator.
Think about experimenting with different types of fruit or spices in your hand pies. Each variation can excite your palate and keep things fun and fresh in the kitchen.
Perfecting Results
Perfecting Results
Achieving perfect cherry hand pies can be a fine balance of practice and attentiveness. The right frying time plays a crucial role in your pies’ texture. Frying them too long can result in a hard crust, while undercooking can lead to a doughy texture. Watch them closely for that ideal golden brown color.
Texture also depends on the function of your pie crust. Store-bought crusts offer convenience but may not bring the same flakiness as homemade dough. If you have extra time, consider making your own pie dough; the results are worth the effort and add a special touch to your cherry hand pies.
Troubleshooting/variations
While preparing cherry hand pies, you may encounter a few problems. If the filling leaks during frying, ensure that you seal the edges properly. Crimping with a fork often helps create a reliable seal.
If the filling seems too runny, increase the cornstarch slightly or let it cook longer to achieve the desired thickness. Furthermore, if you prefer a less sweet option, reduce the sugar in the filling to let the natural flavor of the cherries shine through.
Feel free to customize the glaze, too. Swap out almond milk for another milk alternative or adjust the almond extract to match your taste preferences. This adaptability makes cherry hand pies a fantastic recipe to play with.
Serving and Storing Cherry Hand Pies
Serving/presentation
Cherry hand pies look as delightful as they taste. Serve them warm, drizzled with the almond glaze, for a visually appealing dessert. Consider adding a sprinkle of powdered sugar on top for an elegant finish.
These pies pair perfectly with a scoop of vanilla ice cream or a dollop of fresh whipped cream. Their warm interior contrasts beautifully with the cool toppings, enhancing the overall eating experience. A simple presentation on a rustic wooden board adds charm to your dessert table.
Pairings/storage
Cherry hand pies are versatile and easy to enjoy on their own. However, if you want to complement them with other treats, serve alongside fresh fruit salads or a light yogurt parfait.
When it comes to storage, these hand pies maintain their deliciousness in an airtight container. You can keep them at room temperature for a day or two or refrigerate for up to a week. Reheating in the oven brings back their crispness.
For longer storage, freeze uncooked or cooked hand pies. They freeze well, making them an excellent option for future desserts. Just be sure to wrap them properly, so they don’t become freezer burnt.
The delight of cherry hand pies lies in their simplicity and charm. Invest some time in preparation, and watch the smiles blossom around your table. The smells that envelop your kitchen while baking enhance the experience, making these treats a cherished staple in any dessert repertoire.
Cherry hand pies remain a nostalgic gem that finds a place in every food lover’s heart, offering joy with every bite.
Print
Cherry Hand Pies
- Prep Time: 15 minutes
- Cook Time: 20 minutes
- Total Time: 35 minutes
- Yield: 8 servings
- Category: Dessert
- Method: Frying
- Cuisine: American
- Diet: Vegetarian
Description
Delightful cherry hand pies filled with tangy cherry filling and encased in a flaky crust, perfect for nostalgic gatherings.
Ingredients
- 2 cups of pitted cherries
- 1 cup of sugar
- 2 tablespoons of cornstarch
- 1 teaspoon of vanilla extract
- 1 tablespoon of lemon juice
- 1 package of pie crusts
- Oil for frying
- 1 cup of powdered sugar
- 2 tablespoons of almond milk
- 1/2 teaspoon of almond extract
Instructions
- In a saucepan, combine cherries, sugar, cornstarch, vanilla extract, and lemon juice. Cook over medium heat until thickened. Allow to cool.
- Roll out the pie crust and cut into circles.
- Place a spoonful of cherry filling on one half of the circle, fold, and seal the edges.
- Heat oil in a deep fryer or pot to 350°F (175°C).
- Fry the hand pies until golden brown, about 3-4 minutes per side.
- Remove from oil and drain on paper towels.
- In a bowl, whisk together powdered sugar, almond milk, and almond extract to make the glaze.
- Drizzle the glaze over the warm hand pies and serve.
Notes
Serve warm with a drizzle of glaze and a sprinkle of powdered sugar. Pairs well with vanilla ice cream.
