

➤ Table of Contents
Growing up, Saturday afternoons often meant gathering in the kitchen with my family, a ritual that was never complete without the comforting aroma of garlic bread filling the air. It was our go-to choice for every occasion, from lazy weekends to family gatherings. Fast forward to today, and I find myself still drawn to that same scent, but with a twist—garlic bread grilled cheese. The blend of crispy, buttery bread and melty cheese creates a delightful harmony that never fails to bring a smile to my face.
It’s a simple pleasure, yet one that feels like a warm hug from the past. Garlic bread grilled cheese is not just a dish; it’s a bridge connecting treasured memories with new culinary adventures. Let’s dive into this delicious journey together and explore the magic of creating this savory masterpiece in your own kitchen.
Print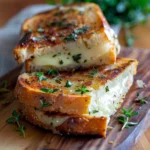
Garlic Bread Grilled Cheese
- Prep Time: 15 minutes
- Cook Time: 10 minutes
- Total Time: 25 minutes
- Yield: Makes 2
- Category: Side Dish
- Method: Frying
- Cuisine: American
Description
Discover the ultimate Garlic Bread Grilled Cheese recipe! Learn how to create this crispy, cheesy delight with simple steps and elevate your sandwich game today.
Ingredients
4 Tbsp (60 ml). unsalted butter, room temperature
2 Tbsp (30 ml). finely chopped parsley
1/2 garlic clove, finely grated
1/2 tsp (3 ml). Diamond Crystal or 1/4 tsp (1 ml). Morton kosher salt
Freshly ground black pepper
4 thick slices Pullman or other sandwich bread
4 oz (113 g). sharp cheddar coarsely grated
Instructions
1. – In a small mixing bowl, thoroughly blend together 4 tablespoons of room-temperature unsalted butter, 2 tablespoons of finely chopped parsley, ½ a finely grated garlic clove, ½ teaspoon of Diamond Crystal or ¼ teaspoon of Morton kosher salt, and several turns of freshly ground black pepper.
2. – Generously apply the butter mixture on one side of each of the 4 thick slices of Pullman or other sandwich bread, using roughly 1 tablespoon per slice.
3. – In a large nonstick frying pan over medium heat, place 2 of the buttered bread slices with the buttered side facing down.
4. – Evenly distribute 4 ounces of coarsely grated sharp cheddar cheese between the bread slices in the pan.
5. – If some cheese spills onto the pan, it’s fine; it will turn crispy and taste great.
6. – Cover with the remaining slices of bread, buttered side up.
7. – Cook for about 4 minutes, checking after a couple of minutes, until the underside of the bread is golden brown and toasted.
8. – Don’t rush this step; lower and slower cooking is preferable.
9. – Carefully flip the sandwiches and continue cooking for another 4 minutes until the other sides are golden brown and the cheese has melted.
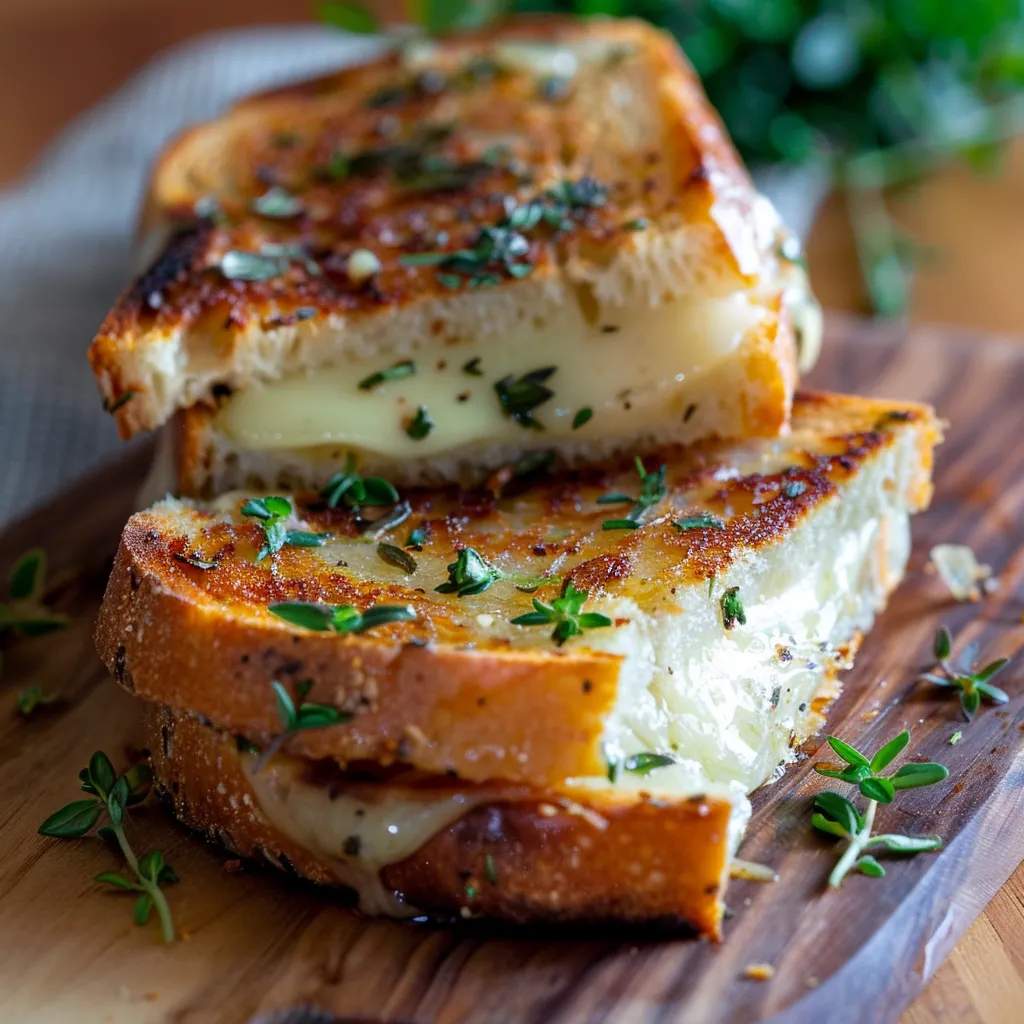
10. – Move the sandwiches to a cutting board and slice each in half.
Notes
1. For a crispier texture, press down gently on the sandwich with a spatula while frying.
2. If you prefer a milder garlic flavor, use less than 1/2 a clove in the butter mixture.
3. Store any leftover sandwiches in an airtight container for up to 2 days and reheat in a skillet to maintain crispiness.
4. Serve with a side of tomato soup for a classic combination without introducing new ingredients.
Getting Started with Garlic Bread Grilled Cheese
Fundamentals
Before you embark on making garlic bread grilled cheese, it’s crucial to understand the basics that set this recipe apart. The fundamentals lie in the perfect balance of flavors and textures, starting with the bread. Opt for thick slices of Pullman or another type of sandwich bread. The thickness ensures a crispy exterior while maintaining a soft interior.
The butter mixture is where the magic begins; it serves as the flavor foundation. With 4 tablespoons of room-temperature unsalted butter, you’ll achieve the right creaminess. Mixing in 2 tablespoons of finely chopped parsley and ½ a finely grated garlic clove introduces the herbal and aromatic elements essential for traditional garlic bread. Season the mixture with ½ teaspoon of Diamond Crystal or ¼ teaspoon of Morton kosher salt, and freshly ground black pepper to taste. This combination creates a savory spread that makes each bite memorable.
As you prepare the butter mix, keep in mind that evenly blending the ingredients is key. This ensures that every bite of your sandwich delivers consistent flavor. Once your butter mix is ready, generously slather it on one side of each bread slice, using about 1 tablespoon per slice. This step ensures that your garlic bread grilled cheese is infused with the rich, buttery taste that makes it irresistible. Explore more on bread fundamentals and butter blending techniques for additional insights.
Preparation/setup
With your ingredients prepared, it’s time to set up your cooking station. Having a clean, organized area will streamline the process and enhance your cooking experience. Start by preparing your nonstick frying pan, placing it over medium heat. This temperature setting is crucial for achieving the golden brown crust without burning the bread. Arrange your buttered bread slices with the buttered side down in the pan. This step is vital to ensure the outer layer crisps up nicely while the cheese inside melts to perfection.
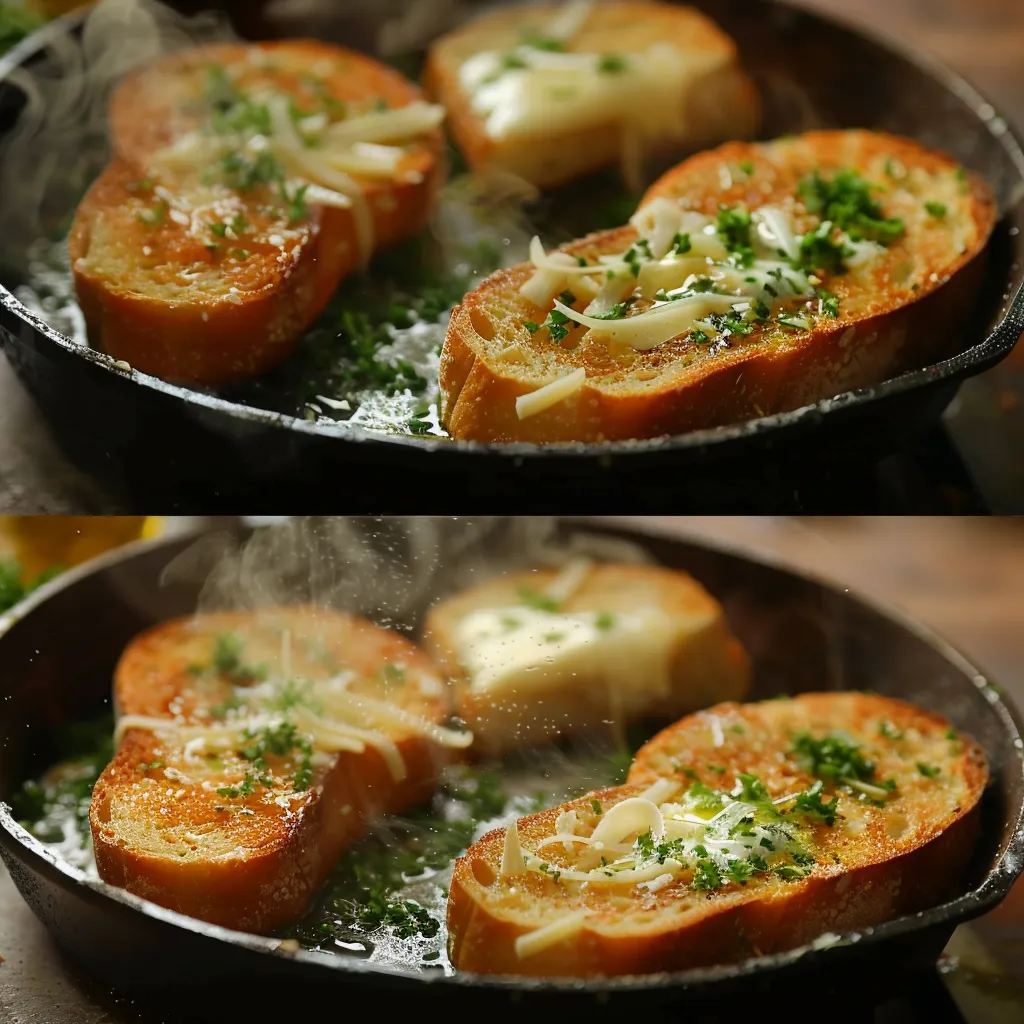
Next, evenly distribute 4 ounces of coarsely grated sharp cheddar cheese between the bread slices. The cheese should cover the surface area of the bread to guarantee a gooey interior. If bits of cheese spill onto the pan, don’t fret; they’ll crisp up and add an extra layer of texture to your sandwich. Place the remaining slices of bread on top, buttered side facing up, to complete the sandwich. Learn more about optimal cheese distribution and perfect pan setup for further guidance. Elevate your sandwich game with this mouthwatering garlic butter BLT sandwich that’s bursting with savory goodness.
Mastering the Technique for Garlic Bread Grilled Cheese
Technique
The technique behind an exceptional garlic bread grilled cheese lies in the cooking process. Start by letting the bread cook for approximately 4 minutes on one side. During this time, resist the urge to rush. The goal is to achieve a deep golden brown color, indicative of a perfectly toasted crust. Check the underside after a couple of minutes to monitor progress. Once it’s ready, carefully flip the sandwiches using a spatula, and let them cook for another 4 minutes on the other side until golden brown and the cheese has fully melted.
The key to successful flipping is patience and precision. A slow, steady hand will prevent any spills or mishaps. As the sandwiches cook, the aroma of garlic and butter will fill your kitchen, creating an irresistible ambiance. This is the moment when the magic truly happens—the cheese transforms into a molten delight, and the garlic butter enhances the overall flavor profile. Discover more about flipping techniques and melting cheese perfection to elevate your skills.
Tips/tricks
To achieve the best results, consider a few tips and tricks that can take your garlic bread grilled cheese to the next level. First, always use room-temperature butter for easier blending and spreading. This ensures an even coating on the bread, promoting a consistent golden crust. Additionally, allowing the bread to cook slowly over medium heat is essential. High heat can cause the bread to burn before the cheese has a chance to melt, resulting in an uneven texture.
If you find yourself with leftover cheese or bread, store them in an airtight container for future use. You can also experiment with different cheese varieties like mozzarella or gouda for unique flavor profiles. Remember, though, that sharp cheddar provides the classic taste that defines this dish. Explore more cheese variety options and storage tips for leftovers for more information.
Optimizing Your Garlic Bread Grilled Cheese
Perfecting results
Perfecting your garlic bread grilled cheese involves fine-tuning the balance of ingredients and technique. Start by ensuring your butter mixture is evenly spread across each slice of bread. This guarantees that each bite is infused with the garlic and parsley flavors that make this dish special. The thickness of the bread also plays a crucial role. Too thin, and it won’t support the cheese; too thick, and the center might remain undercooked. Aim for slices about half an inch thick for ideal results.
Another aspect to consider is the cheese-to-bread ratio. Using 4 ounces of cheese for 4 slices of bread strikes the perfect balance, ensuring each bite is rich without overwhelming the palate. If you notice that the cheese isn’t melting evenly, cover the pan with a lid for a minute or two to help it along. This creates a steamy environment that encourages even melting. Learn more about bread thickness and optimizing cheese melt for additional tips.
Troubleshooting/variations
Troubleshooting your garlic bread grilled cheese can help you overcome common challenges. If your bread is browning too quickly, reduce the heat and allow it to cook longer. This adjustment ensures a golden crust without burning. If the cheese isn’t melting properly, try grating it more finely next time, as smaller pieces melt faster and more evenly.
Variations are another way to explore this dish. Consider adding slices of tomato or sautéed mushrooms for a depth of flavor. You can also try different herbs in the butter mixture, such as basil or oregano, to customize the taste. Remember, though, that the classic combination of garlic, parsley, and sharp cheddar remains a beloved favorite. Discover more variations and solutions and troubleshooting tips for further exploration.
Serving Your Garlic Bread Grilled Cheese
Serving/presentation
The presentation of your garlic bread grilled cheese can elevate the dining experience. After cooking, move the sandwiches to a cutting board and slice each in half. This reveals the gooey cheese center and allows for easy serving. Arrange the slices on a serving platter for a visually appealing display. Consider garnishing with a sprinkle of fresh parsley for a pop of color that complements the dish’s flavors.
For an added touch, serve the sandwiches with a side of marinara sauce for dipping. This complements the garlic and cheese, offering a familiar taste reminiscent of classic Italian cuisine. The sauce’s acidity balances the richness of the cheese, creating a well-rounded flavor profile. Explore more presentation ideas and dipping sauce options for additional inspiration.
Pairings/storage
Pairing your garlic bread grilled cheese with the right accompaniments enhances the meal. A fresh green salad with a light vinaigrette provides a crisp contrast to the sandwich’s richness. Alternatively, a warm bowl of tomato soup is a classic choice that complements the cheesy, garlicky flavors. For storage, allow any leftover sandwiches to cool completely before wrapping them in foil or placing them in an airtight container. Store them in the refrigerator for up to two days, then reheat in a skillet to restore their crispy texture.
For longer storage, consider freezing the sandwiches. Wrap them individually in foil and place them in a freezer-safe bag. When ready to enjoy, thaw in the refrigerator overnight and reheat in a skillet to maintain quality. Discover more pairing ideas and storage solutions for further options. Looking for a quick and tasty lunch idea? This turkey ranch club wrap is a satisfying option packed with flavor.
Conclusion
Garlic bread grilled cheese combines the best elements of both dishes to create a comforting, flavorful meal that’s easy to prepare and enjoy. By focusing on the fundamentals, mastering techniques, and optimizing your approach, you can create a culinary masterpiece that delights the senses. With the right preparation, this dish becomes more than just a meal; it’s a shared experience that invites warmth and joy into your home. As you explore variations and pairings, remember that the heart of this recipe lies in its simplicity and the memories it can create. Whether you’re serving it to family, friends, or enjoying it solo, garlic bread grilled cheese is a timeless classic that never fails to satisfy.
